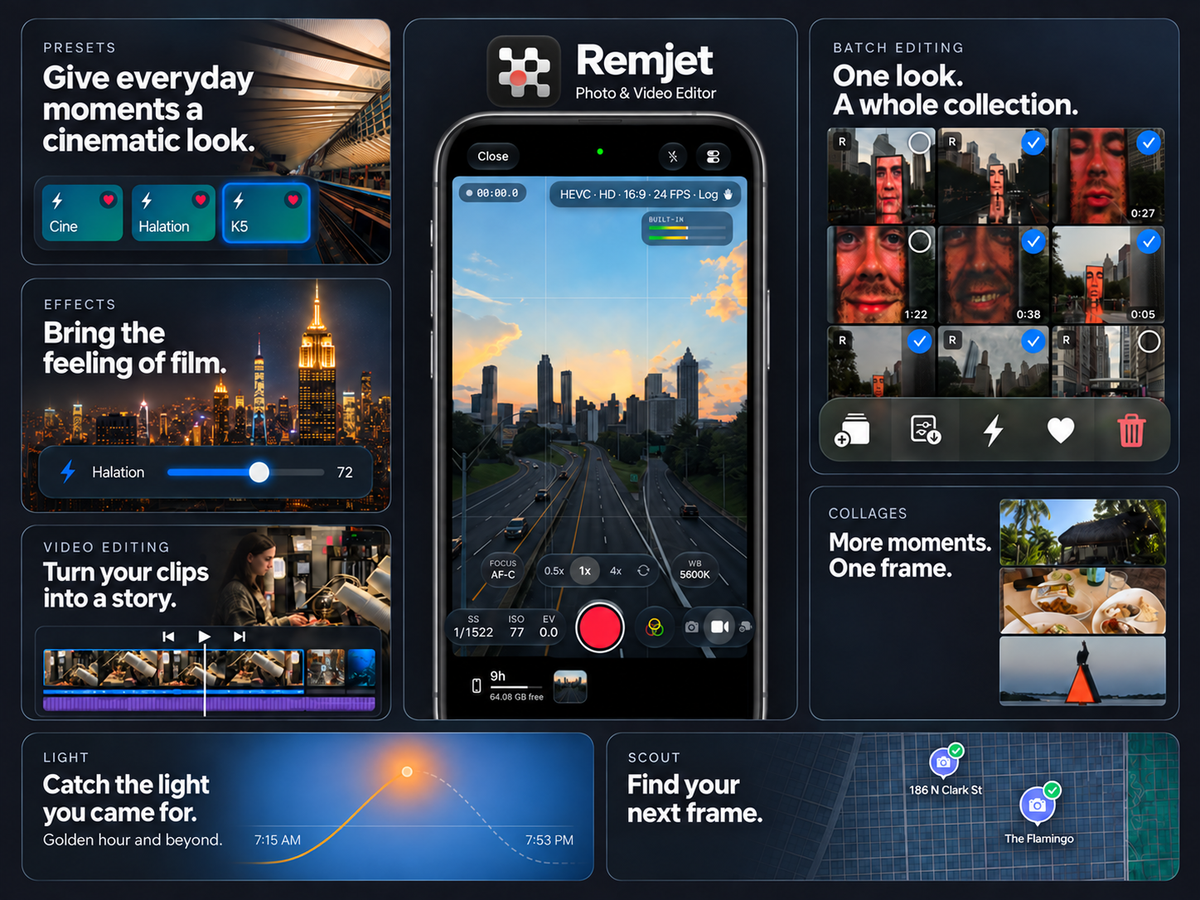
Remjet brings the work around an image into one place: finding a location, understanding the light, choosing how to capture it, and developing the result. You can work on an individual photograph, finish a single video, or assemble a project with multiple clips, text, music, and voiceover.
This guide introduces the controls behind that workflow. It covers the camera's three shooting modes, the Library, photo and video editing, the project timeline, collages, export settings, Light, Scout, Profile, and iOS shortcuts. Use the table of contents to jump to the part of your next shoot that you are preparing for.
Camera options depend on the iPhone, lens, and selected recording format. Where a setting requires particular hardware or another compatible setting, use the choices and availability messages shown on your device. Some editing and export features require Remjet Pro.
One workflow, from location to finished image
A shoot can begin in Scout: save a place, collect reference images, and organize locations into a list. Light adds the timing and direction of the sun so you can consider where your subject will sit relative to it. The camera then lets you decide how much of the exposure, focus, color, and recording format to control yourself.
The Library is the connection between capture and editing. Open existing photos and videos, apply a consistent treatment to a selection, or turn selected media into a collage, slideshow, or video project. You can return to an editable result and make another decision later, then create a separate export when you are ready to deliver it.
That last distinction runs through Remjet: the source, the editable work, and the finished export have different roles. Keeping track of them gives you room to experiment without treating every output as a new starting point.
Camera controls: exposure, focus, white balance, and monitoring
Auto, Shutter Priority, ISO Priority, and Manual
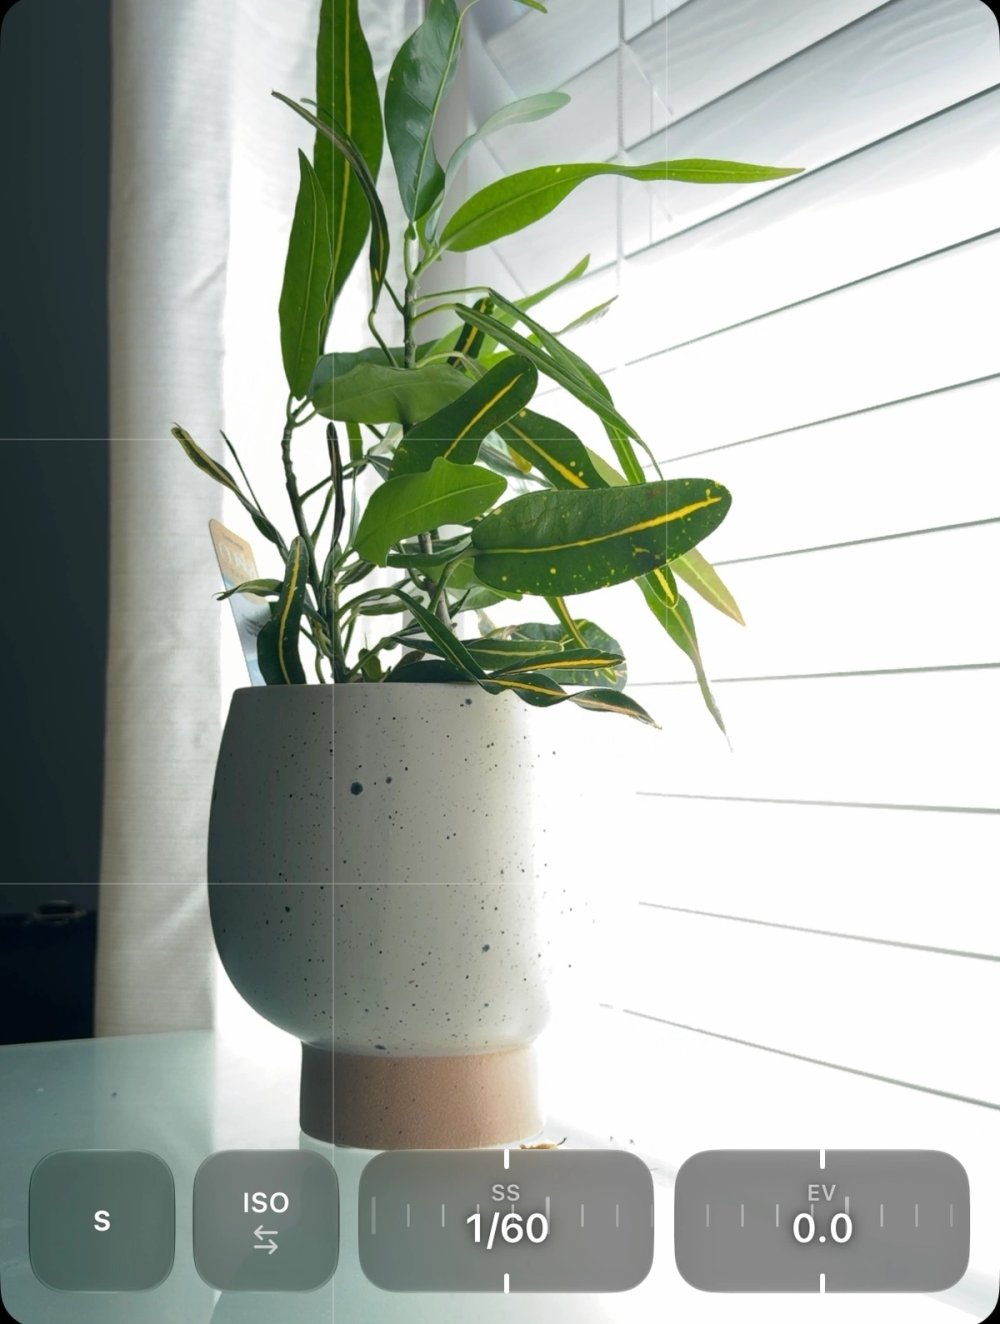
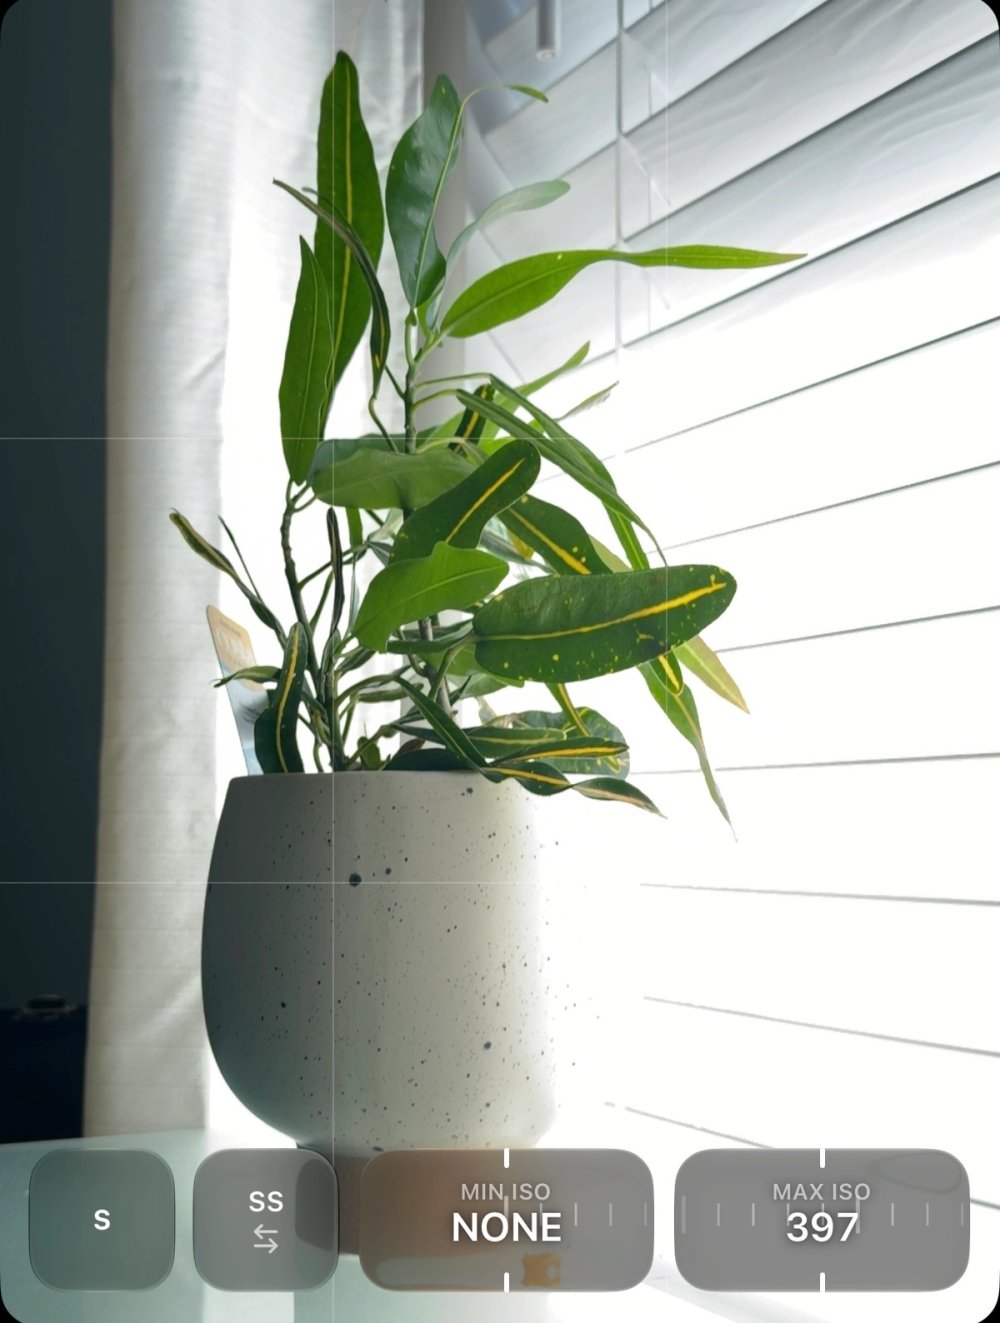
The exposure selector offers Auto, Shutter Priority, ISO Priority, and Manual. Choose the mode according to the variable that matters most to the image.
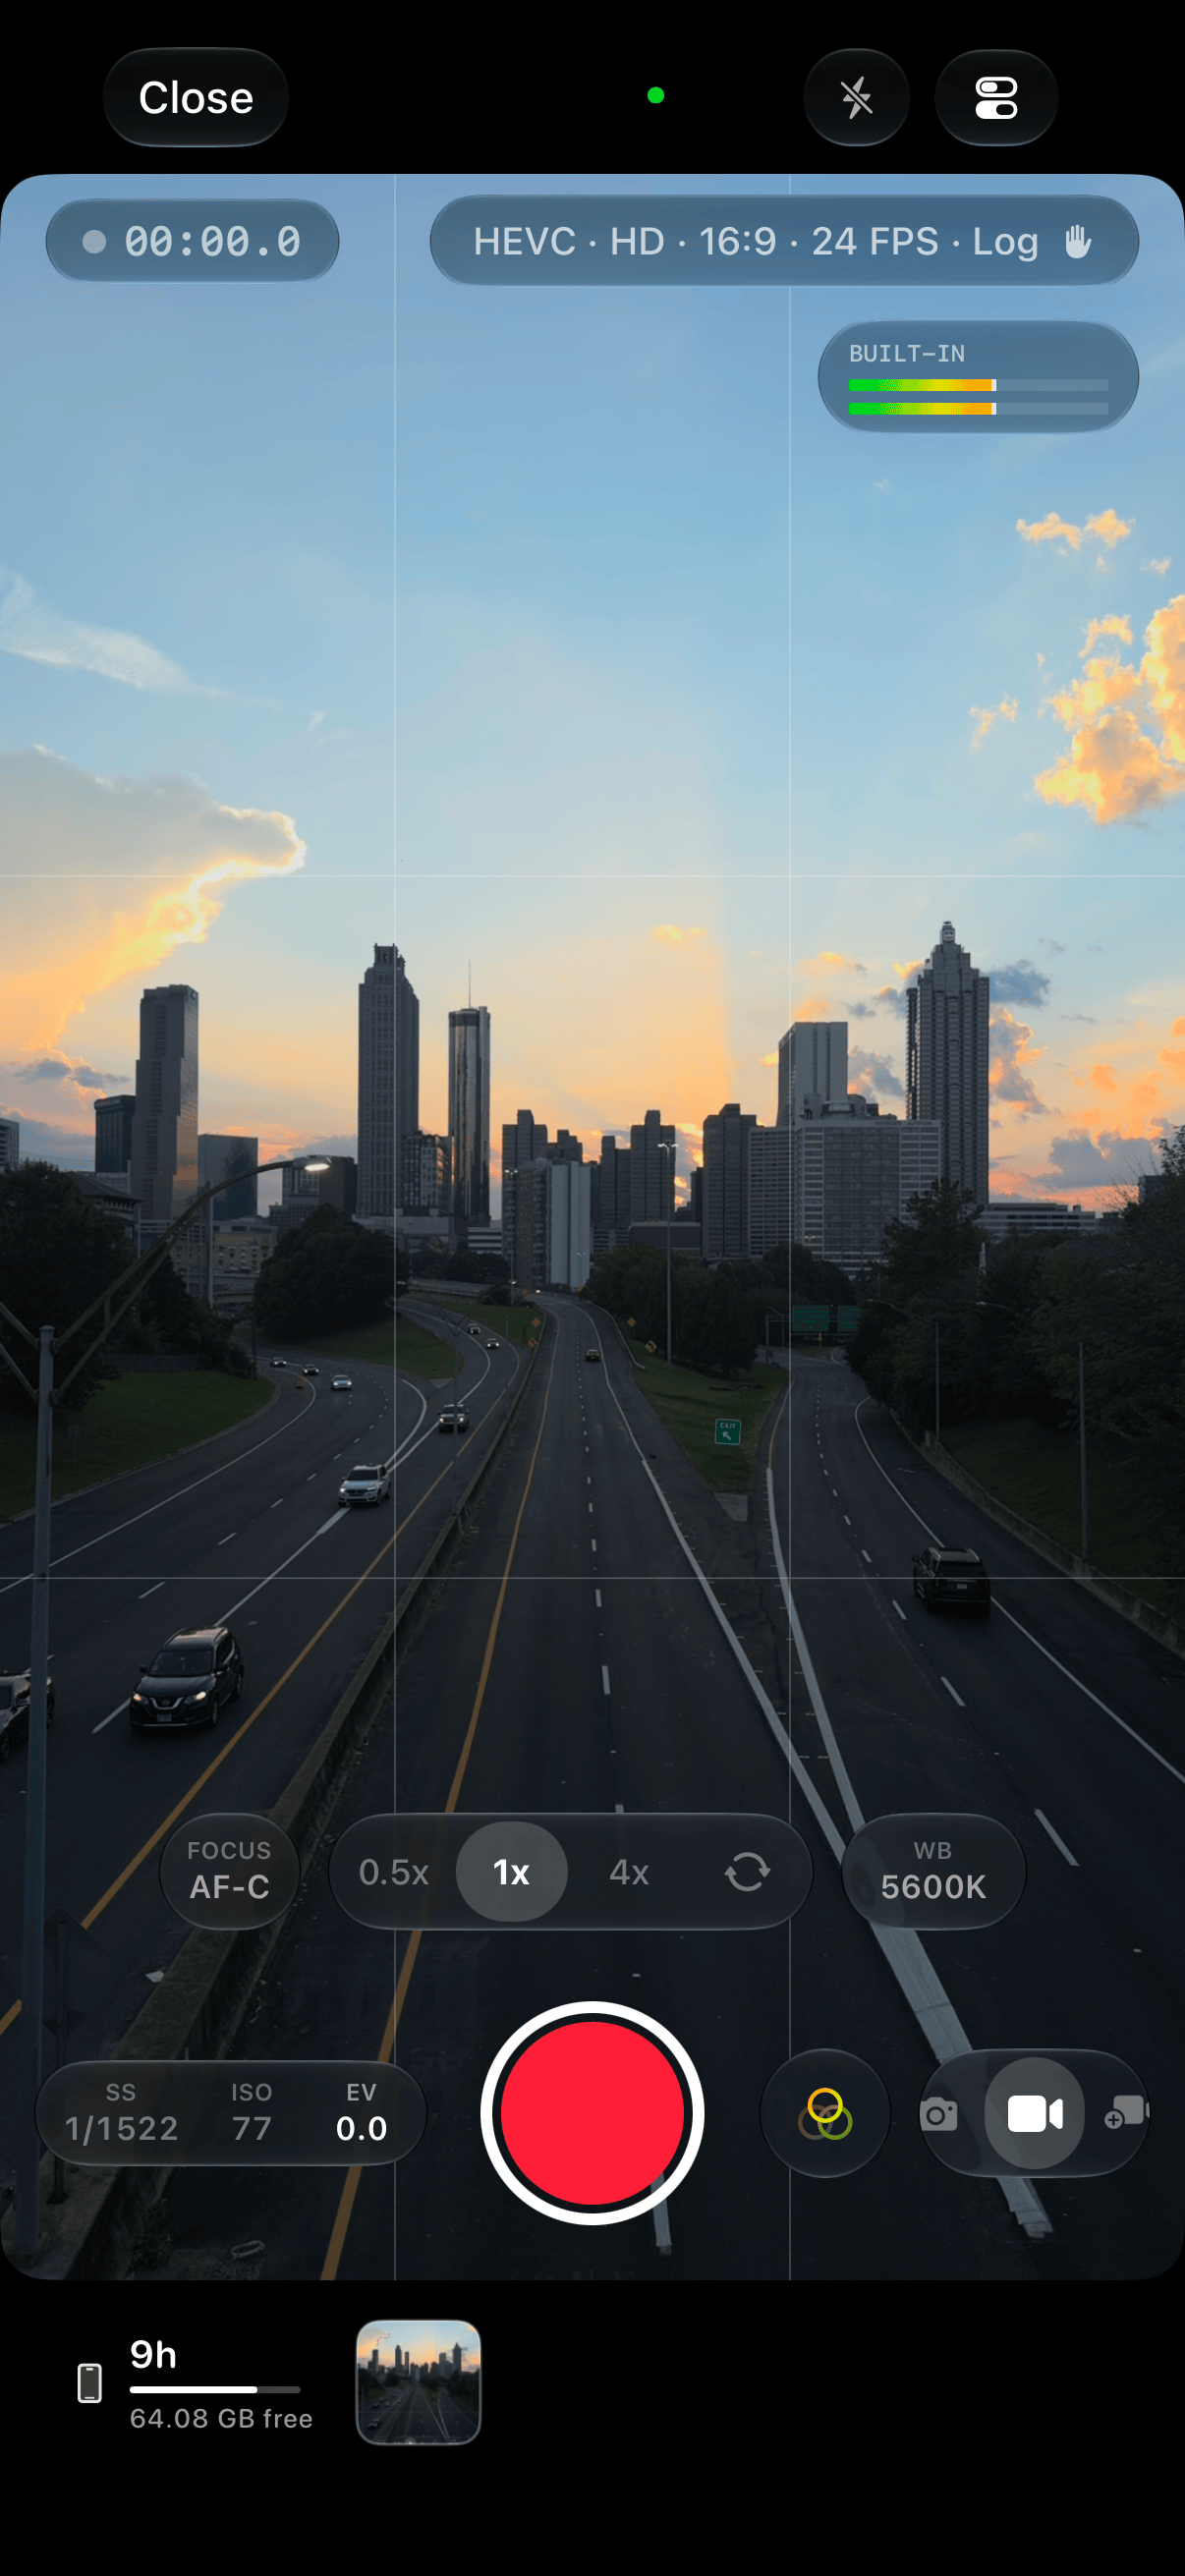
In Auto, let the camera respond to the scene. Exposure compensation, labeled EV, changes the target used by automatic metering. It is useful when the meter's interpretation of a bright background or dark subject differs from the image you want to make.
Shutter Priority, labeled S, gives you control over shutter duration while the camera adjusts ISO. Use it when movement is the first decision: a shorter exposure to retain detail in a moving subject, or a longer exposure to allow more motion blur. In video, shutter duration also affects the character of movement within each frame.
ISO Priority holds your chosen ISO while shutter duration responds to the light. It gives you a different constraint to work around, useful when you want a consistent sensitivity setting and can accept changes in motion rendering. Manual, labeled M, lets you set both variables yourself.
The exposure panel exposes the relevant shutter, ISO, EV, and minimum/maximum limits for the selected mode. Limits constrain what automatic metering can do; they do not create more light. If the scene falls outside the permitted range, reconsider the limit or change the lighting. Exposure lock is a separate control, so freezing a metered exposure is a different action from switching to Manual.
Focus and focus peaking
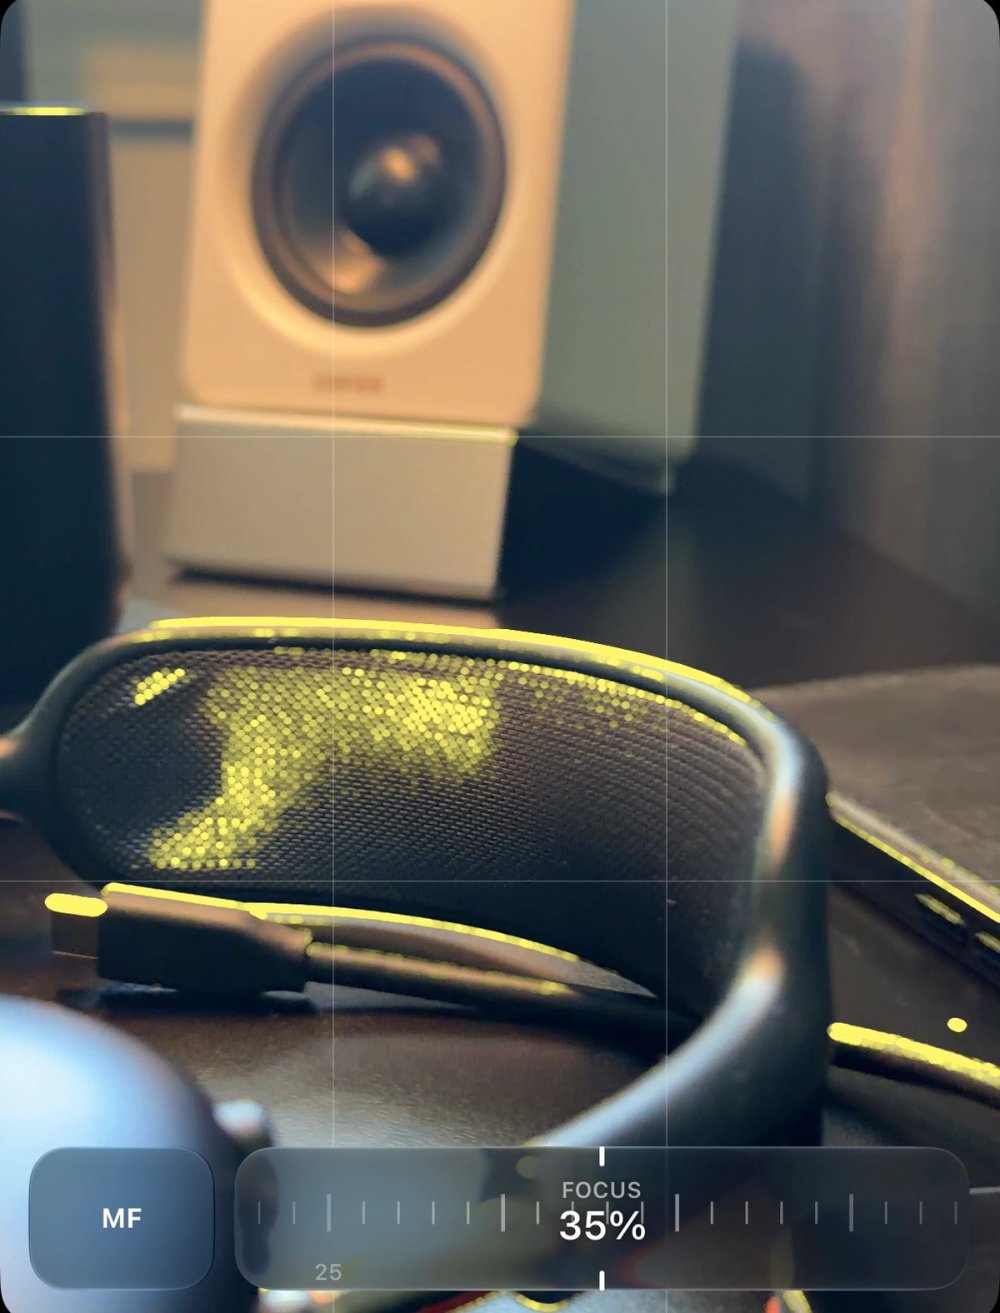
Autofocus is useful when the subject or camera position keeps changing. Manual focus gives you a deliberate focus position when you are working on a static composition or pulling focus during a take.
Focus peaking highlights edges to help you judge focus while using manual focus. Choose a peaking color that remains visible against the scene. A colored edge is an aid to judgment: examine the part of the subject that matters, particularly when fine textures or a high-contrast background compete for attention.
For a product photograph, establish the framing and then adjust focus around a small detail such as lettering. For video, rehearse the change between near and distant subjects before recording. Peaking helps you follow that transition without making the overlay part of the intended visual treatment.
White balance and recording consistency
White balance has automatic behavior and manual temperature/tint controls. Temperature adjusts the warm–cool balance; tint addresses the other axis of a color cast. Set a neutral starting point before applying a creative treatment, then decide whether the scene should stay neutral or retain the character of its lighting.
Lock White Balance on Record has a specific purpose: it freezes automatic white balance when a take begins and allows automatic adjustment to resume afterward. A balance you have already locked or set manually stays under your control. This is useful when the camera moves between light sources and an automatic color shift would be distracting within the shot.
Zebras and false colour
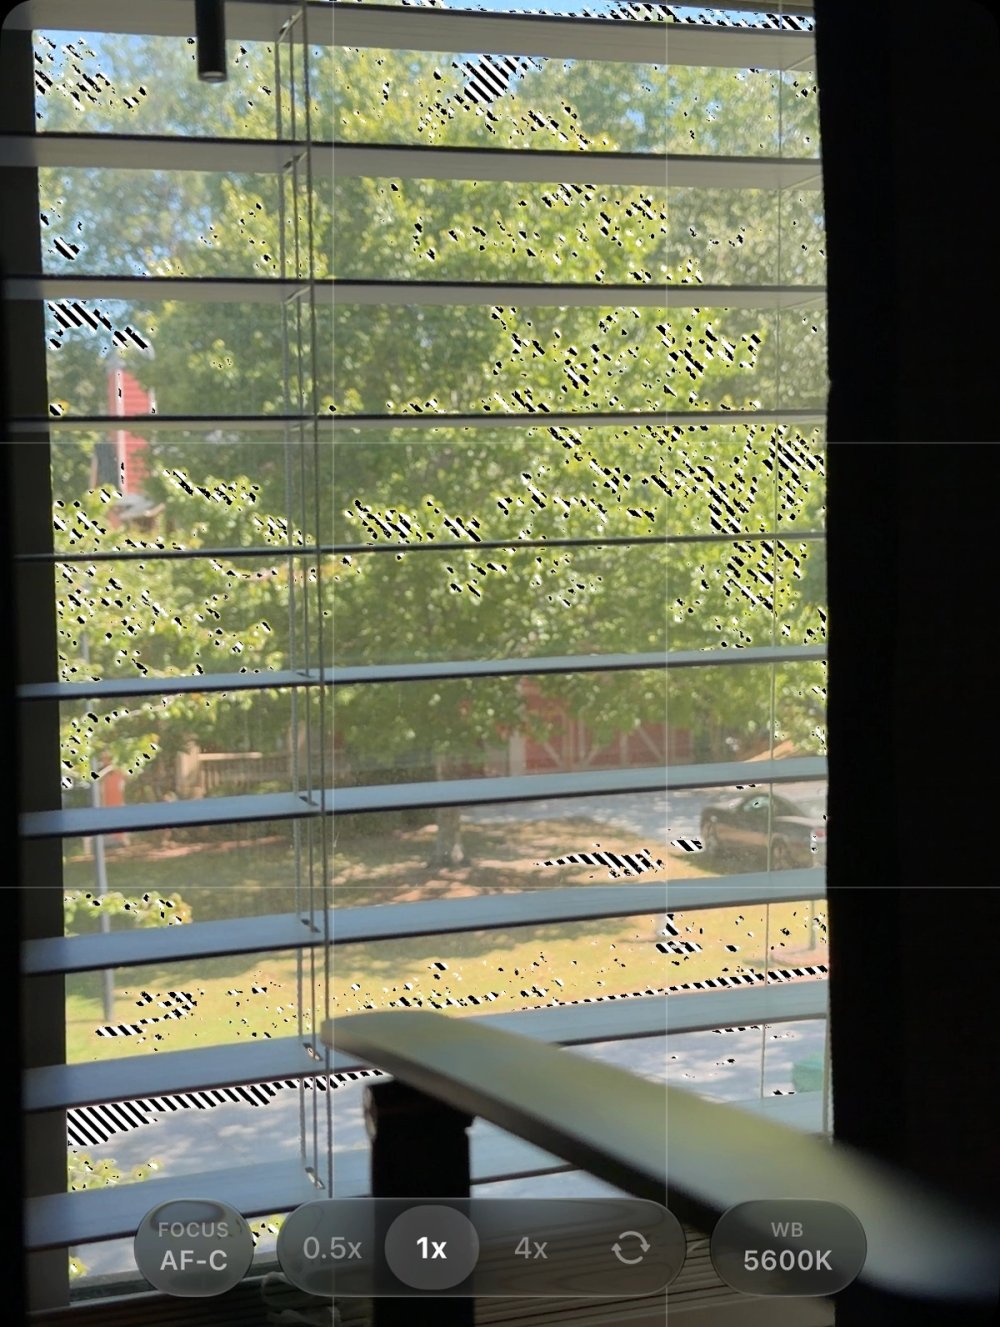
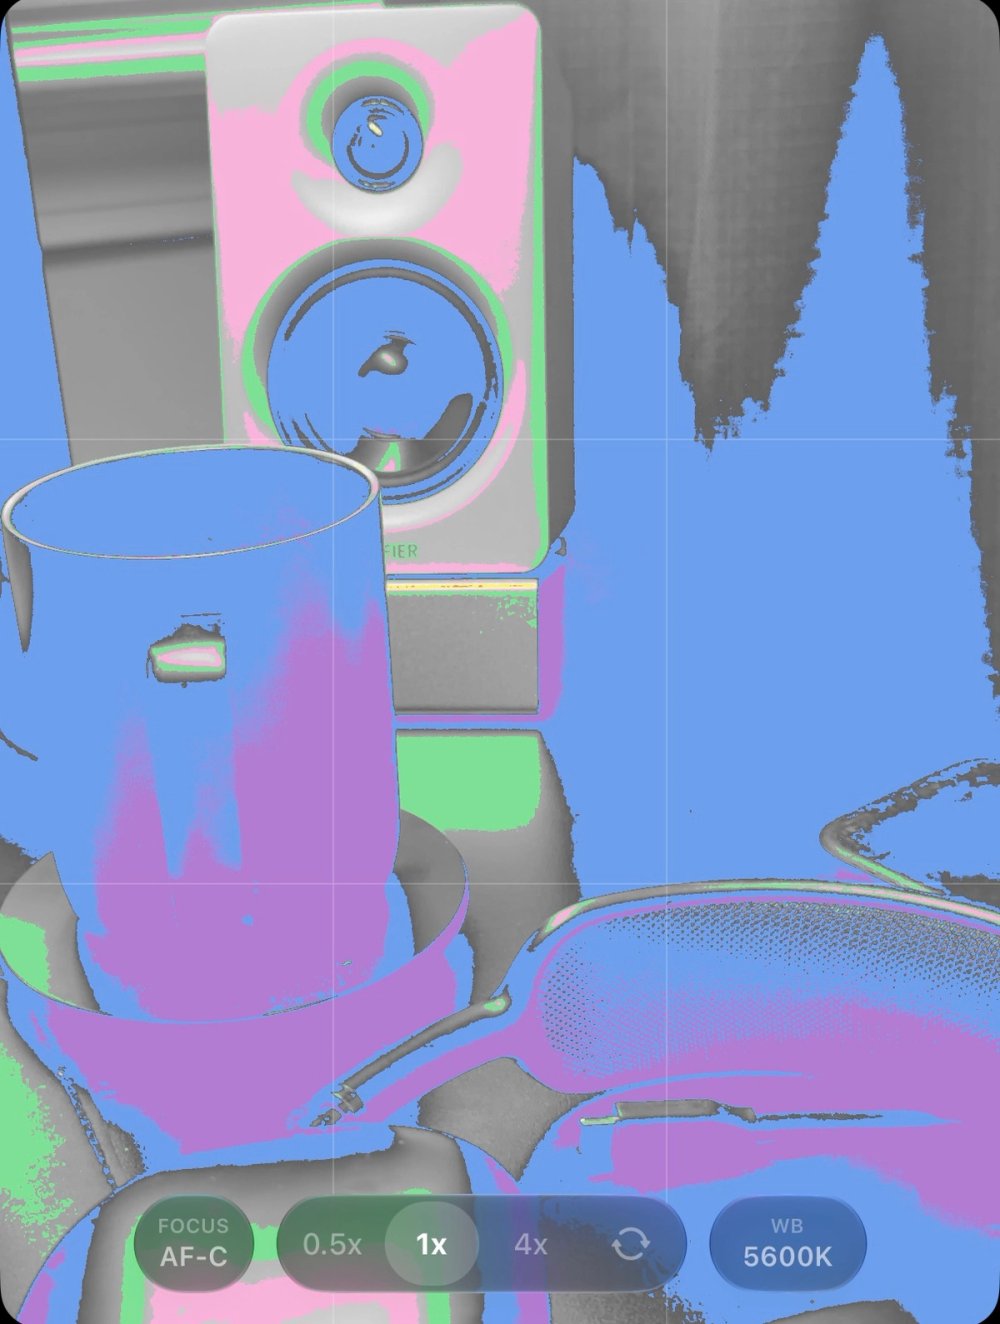
Zebras offer 70, 80, 95, and 100 IRE thresholds, plus Off. They stripe regions that meet the selected monitoring threshold. Lower thresholds let you inspect a chosen brightness region; higher thresholds draw attention to bright areas. Pick the threshold for the subject and the decision you are making instead of leaving an unexplained warning pattern on the screen.
False Colour replaces the normal image with an exposure map. It makes differences in brightness easier to read when the scene's colors distract from its tonal structure. Use it to assess the distribution of dark, middle, and bright regions, then return to the normal image to judge composition and color.
Both aids should be interpreted in the context of the active image pipeline. A monitoring threshold is not a promise about how much detail can be recovered later from every recording format. Check the actual image and protect highlights that matter to the shot.
Framing, looks, and audio
Lens and zoom controls establish the field of view. Grid lines support alignment, while Mirror Front Camera determines whether saved selfies follow the mirrored viewfinder presentation. Available aspect ratios vary by shooting mode and camera.
Presets and LUT controls let you consider a look while shooting. Technical Log conversion and a creative LUT serve different purposes: one interprets an input encoding, while the other supplies a color treatment. The relationship between the clean capture and its saved look also depends on whether you use the Photo Library or external storage, described later in this guide.
For video, check microphone selection and the audio meter before the take. A good picture does not reveal that the wrong microphone was selected. Make a short test recording when changing the input or the recording setup.
Photo mode: processing, RAW, and output choices
Standard and Natural
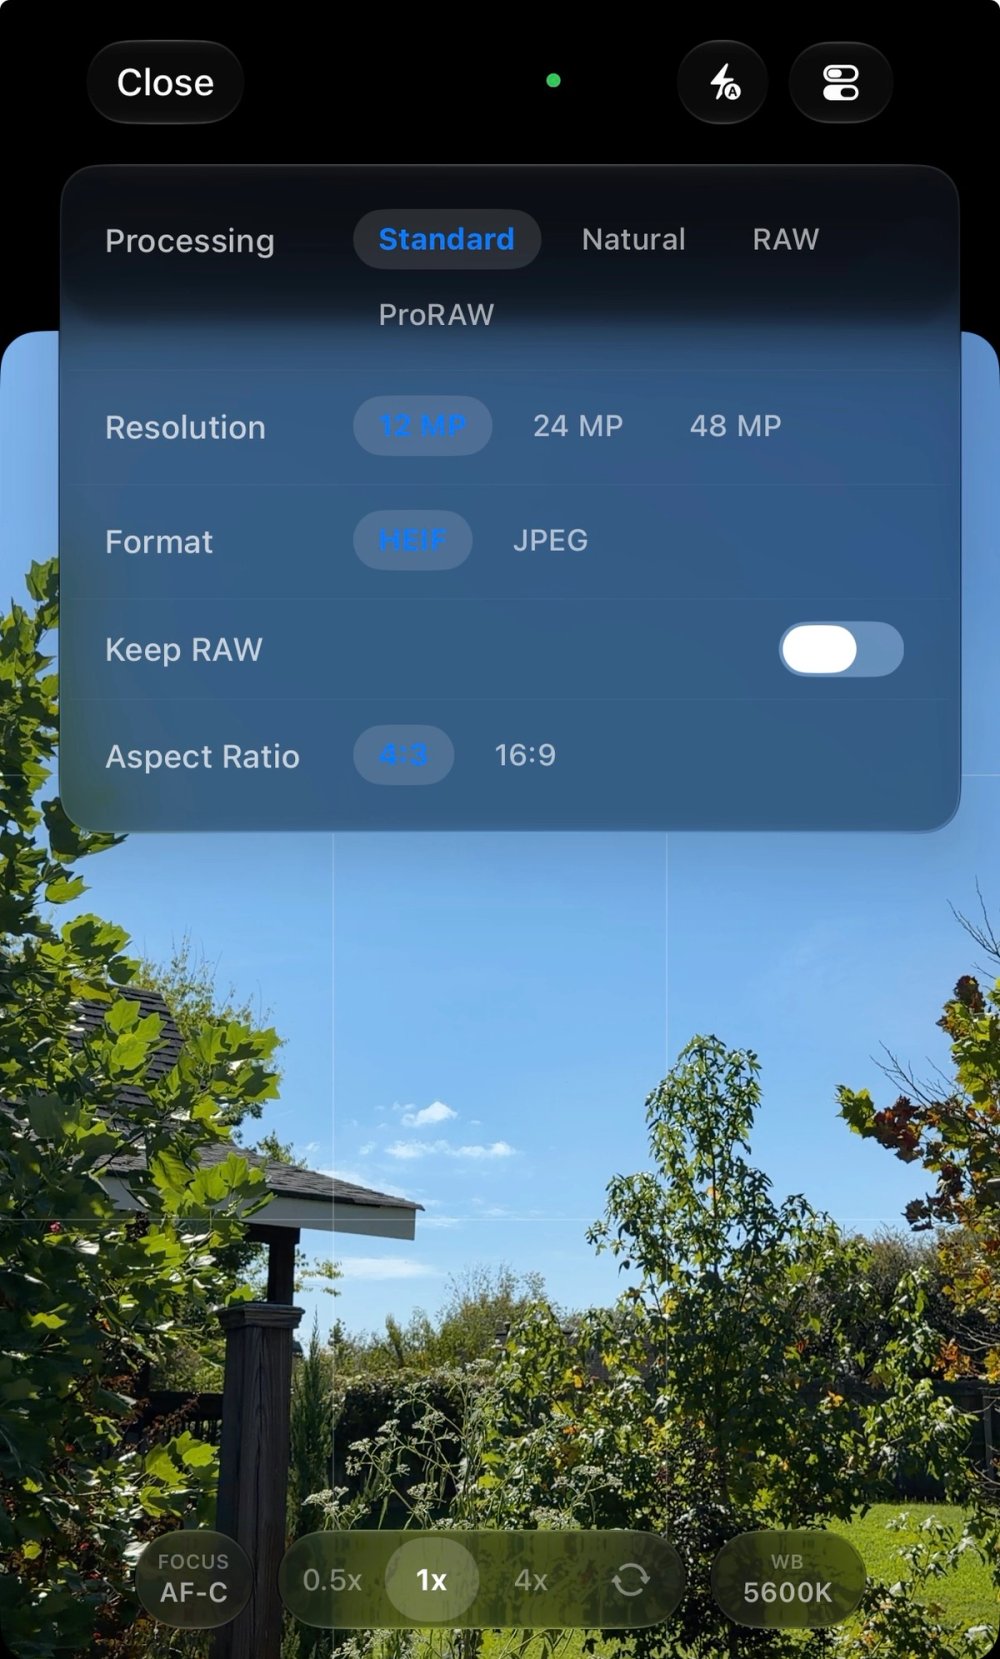
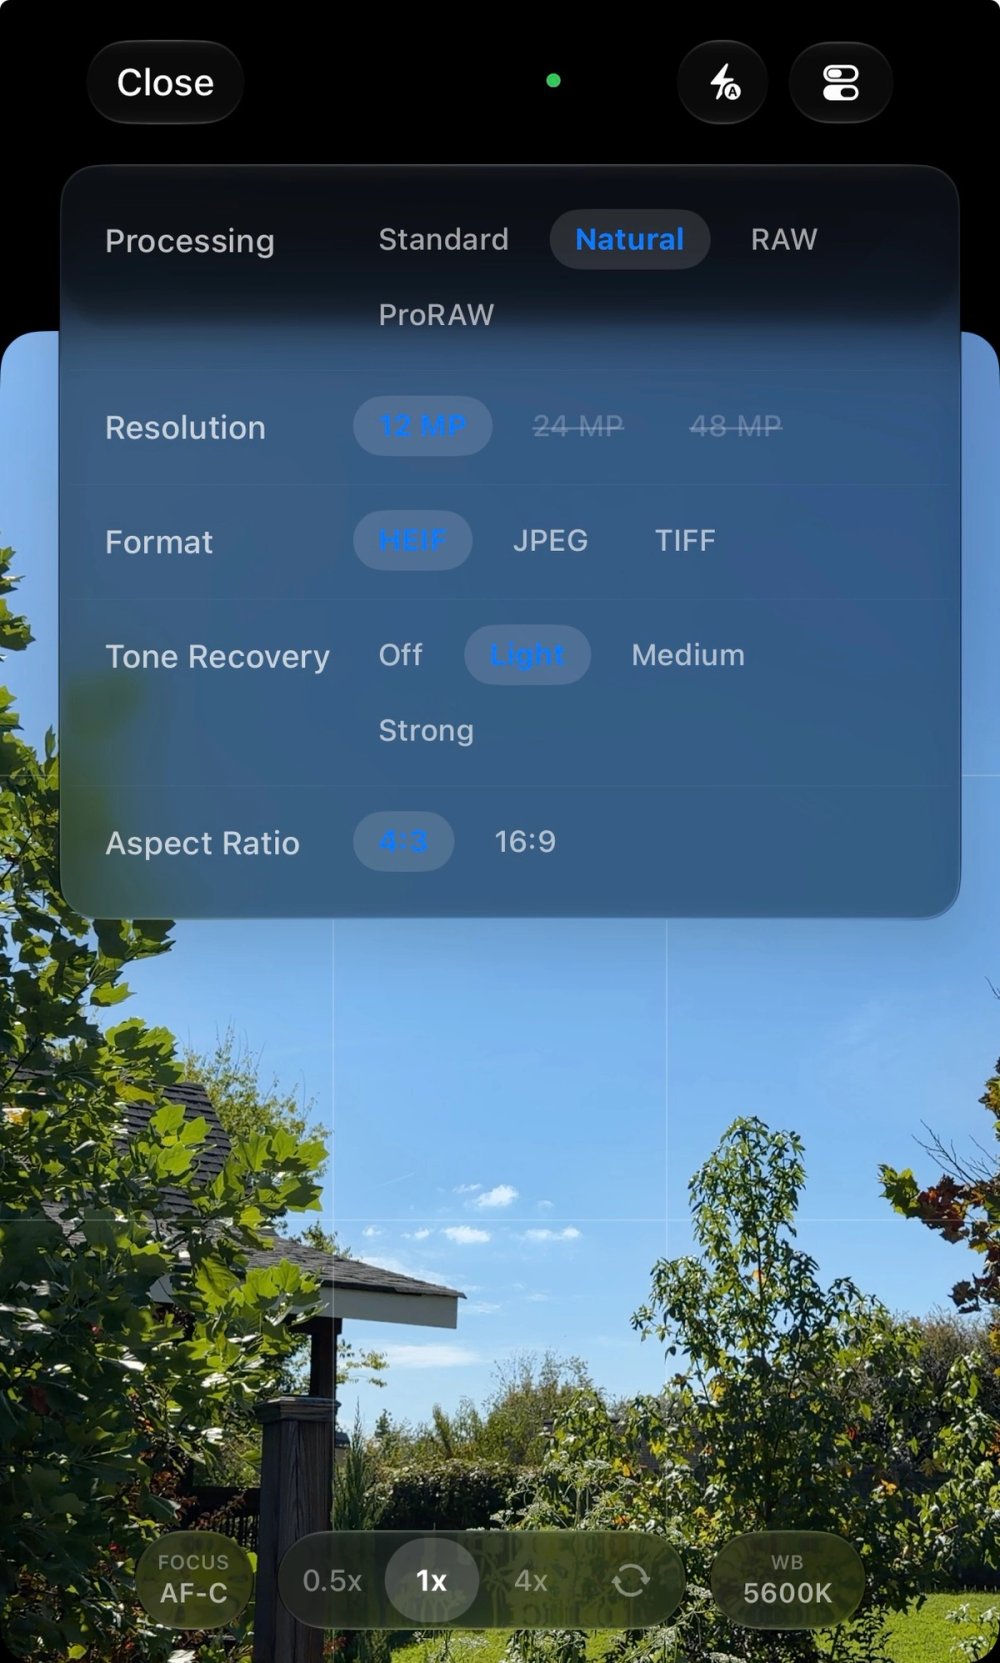
Standard uses the processed-photo path and offers HEIF or JPEG output. It suits photographs that you want to take into a familiar processed-image workflow, with further adjustments available in the editor.
Natural develops a Bayer RAW capture through Remjet's processing path. Its output choices are HEIF, JPEG, and TIFF, with Tone Recovery set to Off, Light, Medium, or Strong. This separates the choice of processing from the choice of file format: a TIFF is an output container, while Natural describes how the captured image is developed.
Tone Recovery gives you a choice of tone-curve strength. Compare it on a scene with both bright and dark areas, and choose the result that leaves the relationships you want to refine in editing. Natural depends on support for the required RAW capture path, so it is not available on every camera configuration.
RAW, ProRAW, and companions
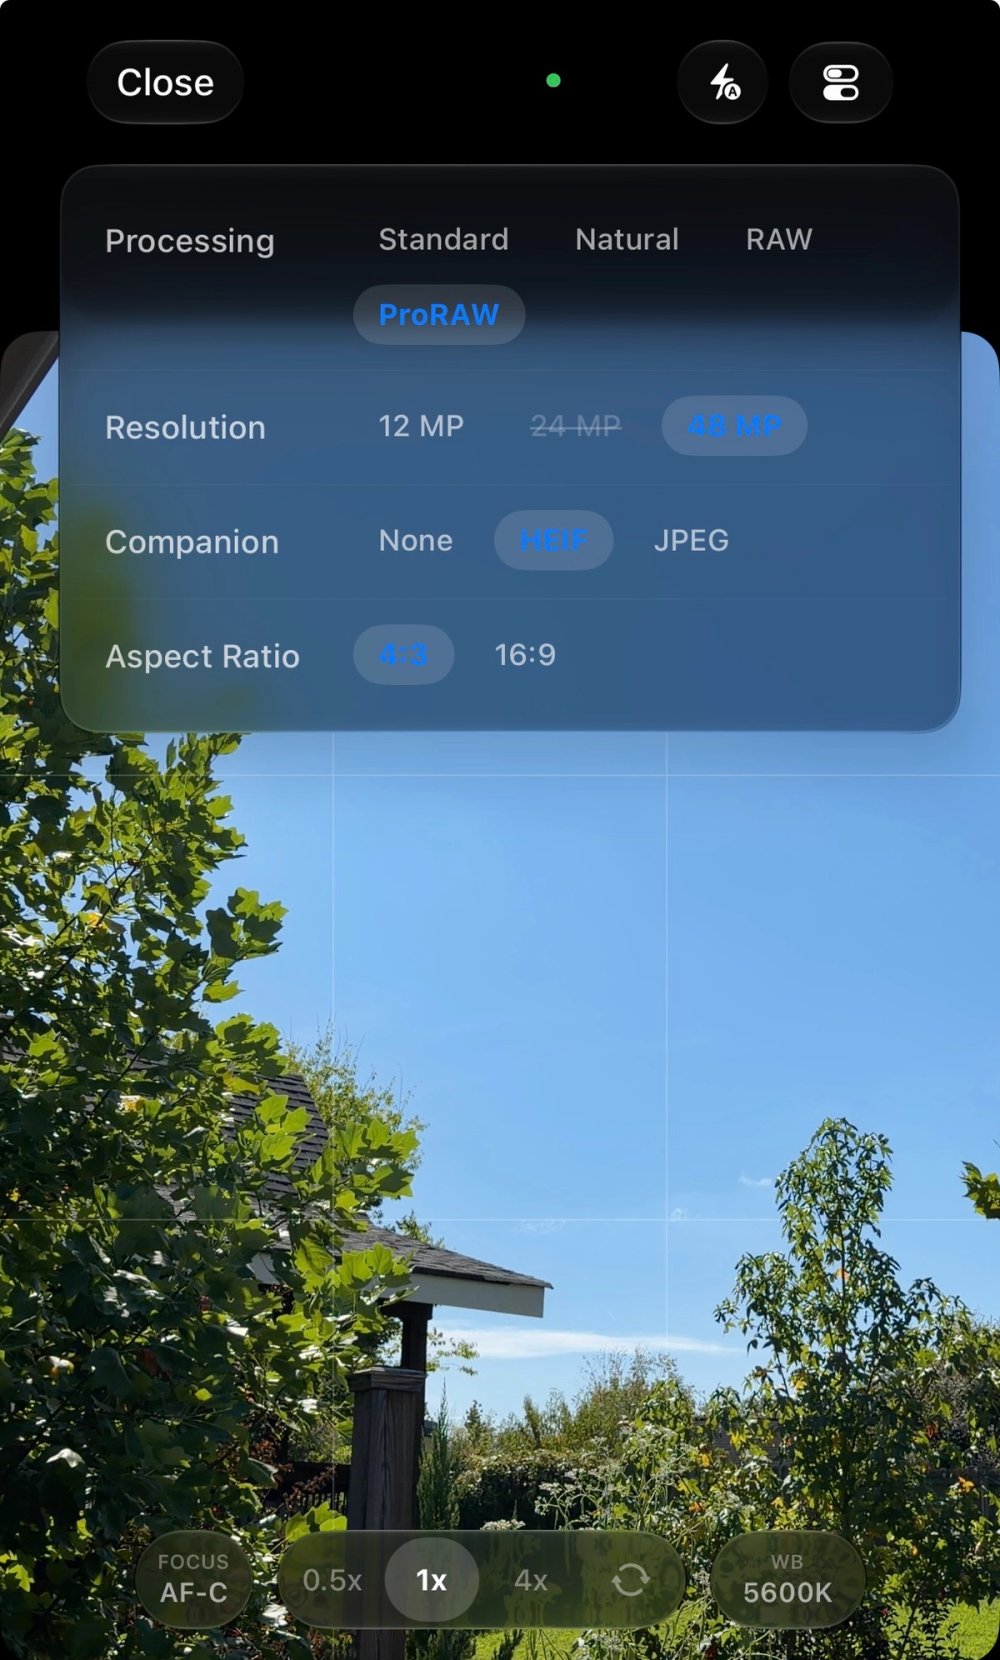
RAW and ProRAW are separate capture choices. Use the supported option when retaining a RAW source is part of your editing workflow. The processed preview or companion is not the same thing as that source.
Companion settings offer None, HEIF, or JPEG alongside the DNG where supported. A companion gives you a processed image as well as the RAW master; None avoids requesting that additional processed companion. Review Keep RAW and the processing options shown for your selection so you know which originals you are retaining.
A useful working habit is to decide this before the shoot. If you need a RAW master for later development, verify that the chosen mode retains one. Exporting an edited JPEG as TIFF later does not turn it into a RAW capture.
Resolution and aspect ratio
Photo resolution choices include requests for 12, 24, and 48 MP, subject to the selected hardware and capture configuration. A higher requested resolution is useful when the extra detail serves the output, but it is not available identically across all lenses and processing modes.
The Photo ratio choices include 4:3 and 16:9. A front-camera Open Gate option is conditional on that camera's native shape. Do not assume that the Video ratio list also applies to Photo mode.
For a deliberate still workflow, start with the processing mode and retained source you need, choose framing and resolution, then set exposure and focus. Those decisions determine what material reaches the editor.
Video mode: recording format and image character
Resolution, aspect ratio, and frame rate
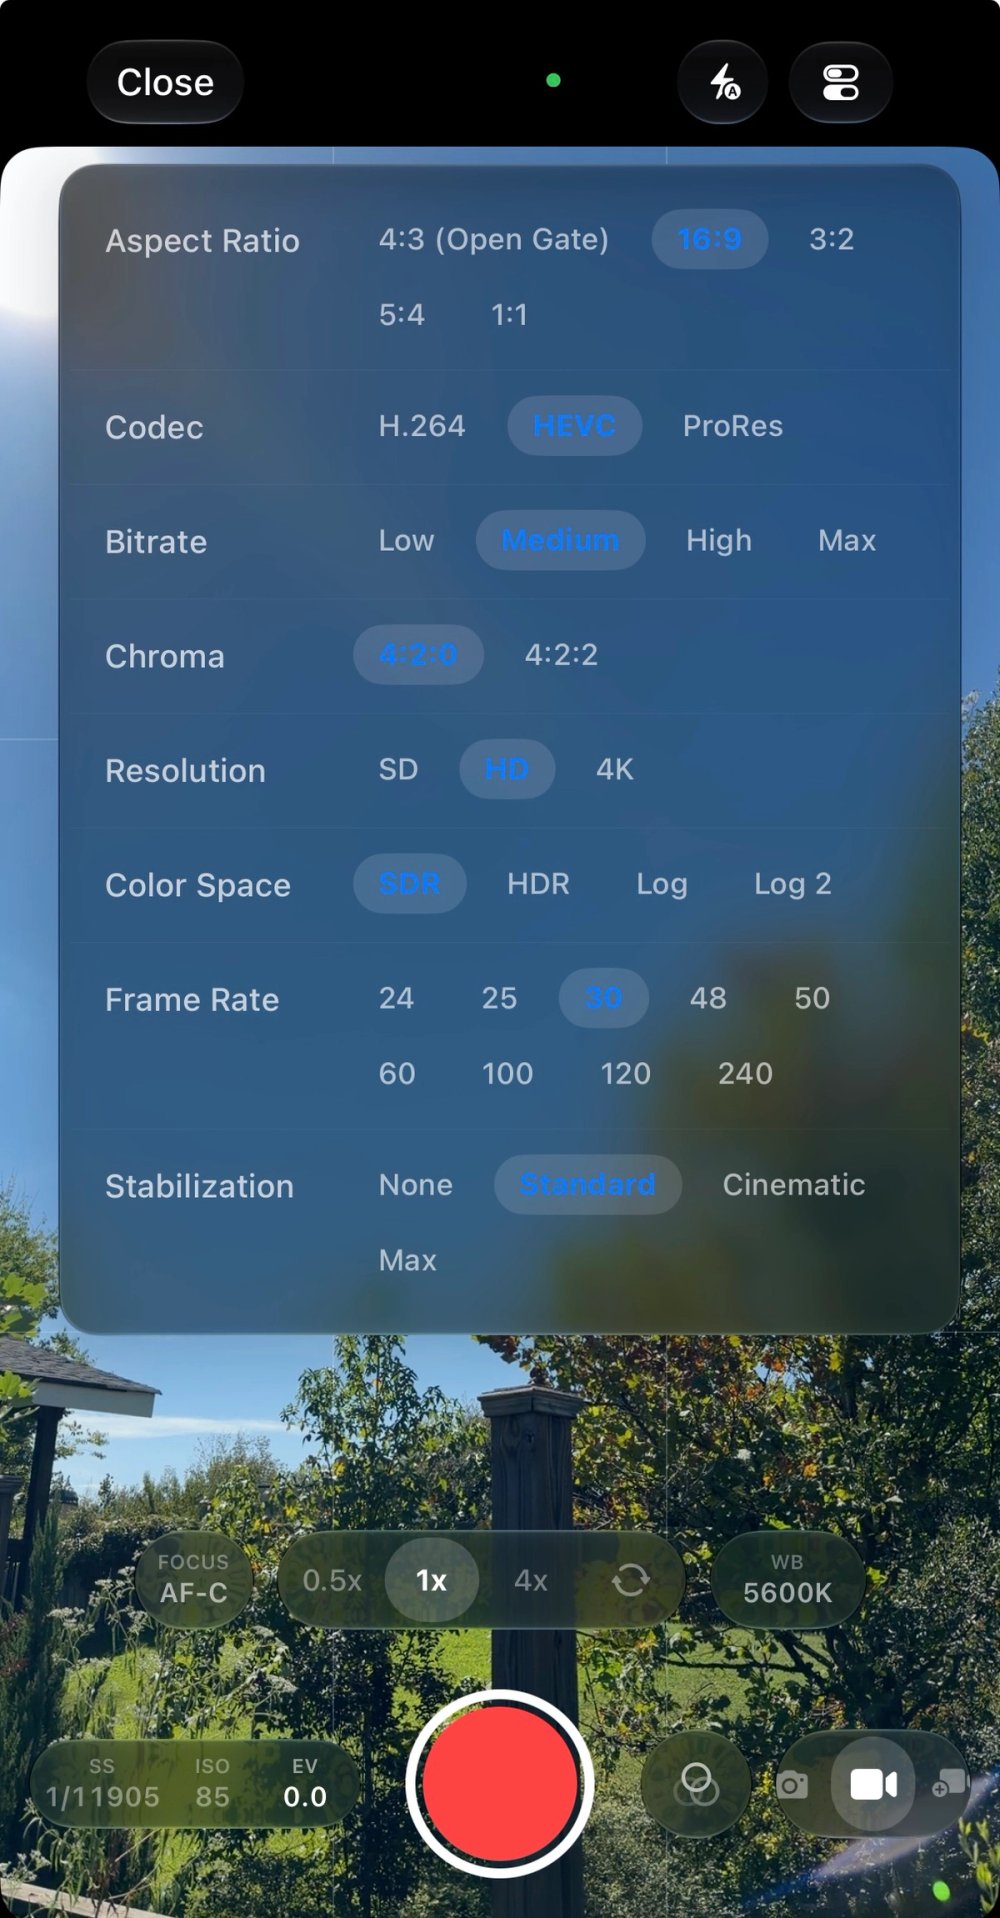
Video settings combine resolution, aspect ratio, frame rate, codec, color space, and stabilization. They form a recording configuration; changing one can affect the availability of another.
Resolution labels include SD, HD, and 4K. The video aspect-ratio choices include 4:3, 3:2, 5:4, 1:1, and 16:9. Choose a composition appropriate for the final frame rather than relying on a later crop to solve every delivery requirement.
Frame-rate options are filtered by the active configuration. Choose from the rates available on your device for the intended motion and delivery. Acquisition frame rate, timeline playback speed, and exported frame rate are separate decisions. Recording more frames can support a slower interpretation of movement, but merely choosing a different export frame rate is not the same operation as retiming a clip.
H.264, HEVC, and ProRes
The codec selector includes H.264, HEVC, and ProRes where supported. ProRes has Proxy, LT, 422, and HQ choices. These are different compression profiles with different storage demands; select a recording format that fits both the shoot and the downstream workflow.
Bitrate controls and chroma-sampling options appear where applicable. Chroma sampling describes how color information is represented relative to brightness information. A 4:2:2 option should not be read as a promise that every codec, lens, resolution, and frame rate supports that choice.
For a long recording, capacity and sustained recording conditions matter alongside image settings. For a short clip intended for substantial editing, a larger source may be a worthwhile tradeoff. Check the full combination instead of choosing settings independently from a list of maximum specifications.
SDR, HDR, Log, and Log2
Color-space choices include SDR, HDR, Log, and Log2 when available. Log recording and a finished display image play different roles. A Log source needs an appropriate interpretation in the editing workflow; a creative LUT is not automatically the correct technical conversion for it.
If a requested color space is unavailable for the selected resolution and frame rate, Remjet displays a warning that recording will use SDR. Read that effective-setting message before starting the take. A selected label does not override the camera's capabilities.
Stabilization and sound
Stabilization choices include None, Standard, Cinematic, and Max. If the selected configuration cannot provide the required margin for stabilization, the camera warns that it will record unstabilized. Recheck framing and movement after changing the setting.
Set white balance, exposure behavior, focus, and microphone input as part of the recording setup. A rehearsed take with consistent color and usable audio gives the editor more to work with than a format choice alone.
Project capture: build a sequence while shooting
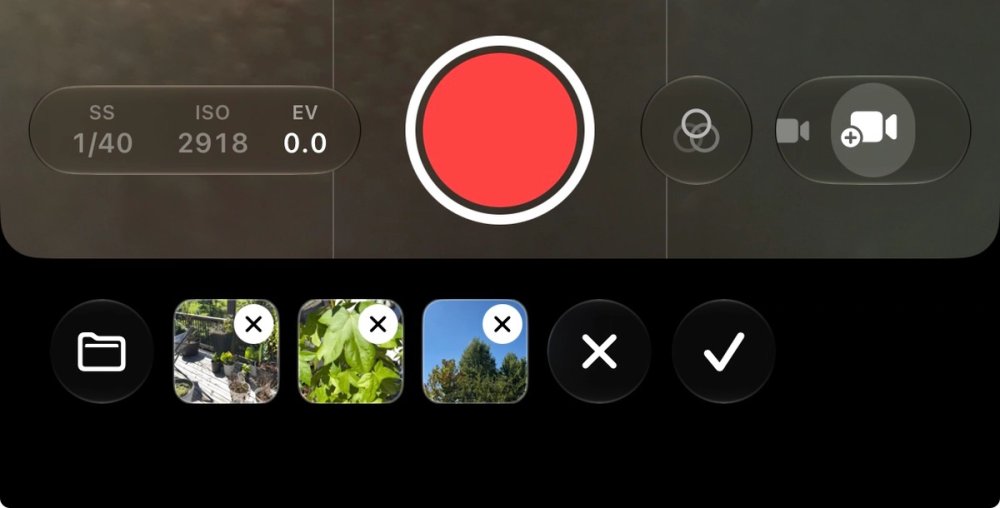
The mode switcher separates Photo, Video, and Project. Project uses the video camera for a workflow built around multiple takes. It is useful when you are already thinking in sequences: an establishing shot, a closer view, a detail, and a final moment.
The project menu lets you start a New Project or resume an existing camera draft. When finishing, choose Save Video Project to keep one editable project, Save Individual Clips for separate videos, or Continue Recording to keep working on the sequence.
This makes the point of departure explicit. A single-video workflow begins with one clip to finish. A project workflow begins with material whose order, duration, sound, and text may change together on a timeline.
Before leaving the camera draft, use the save option that matches your intention. Discarding a camera draft is a deletion action, not another way to finish the project.
Library: select, inspect, organize, and reuse
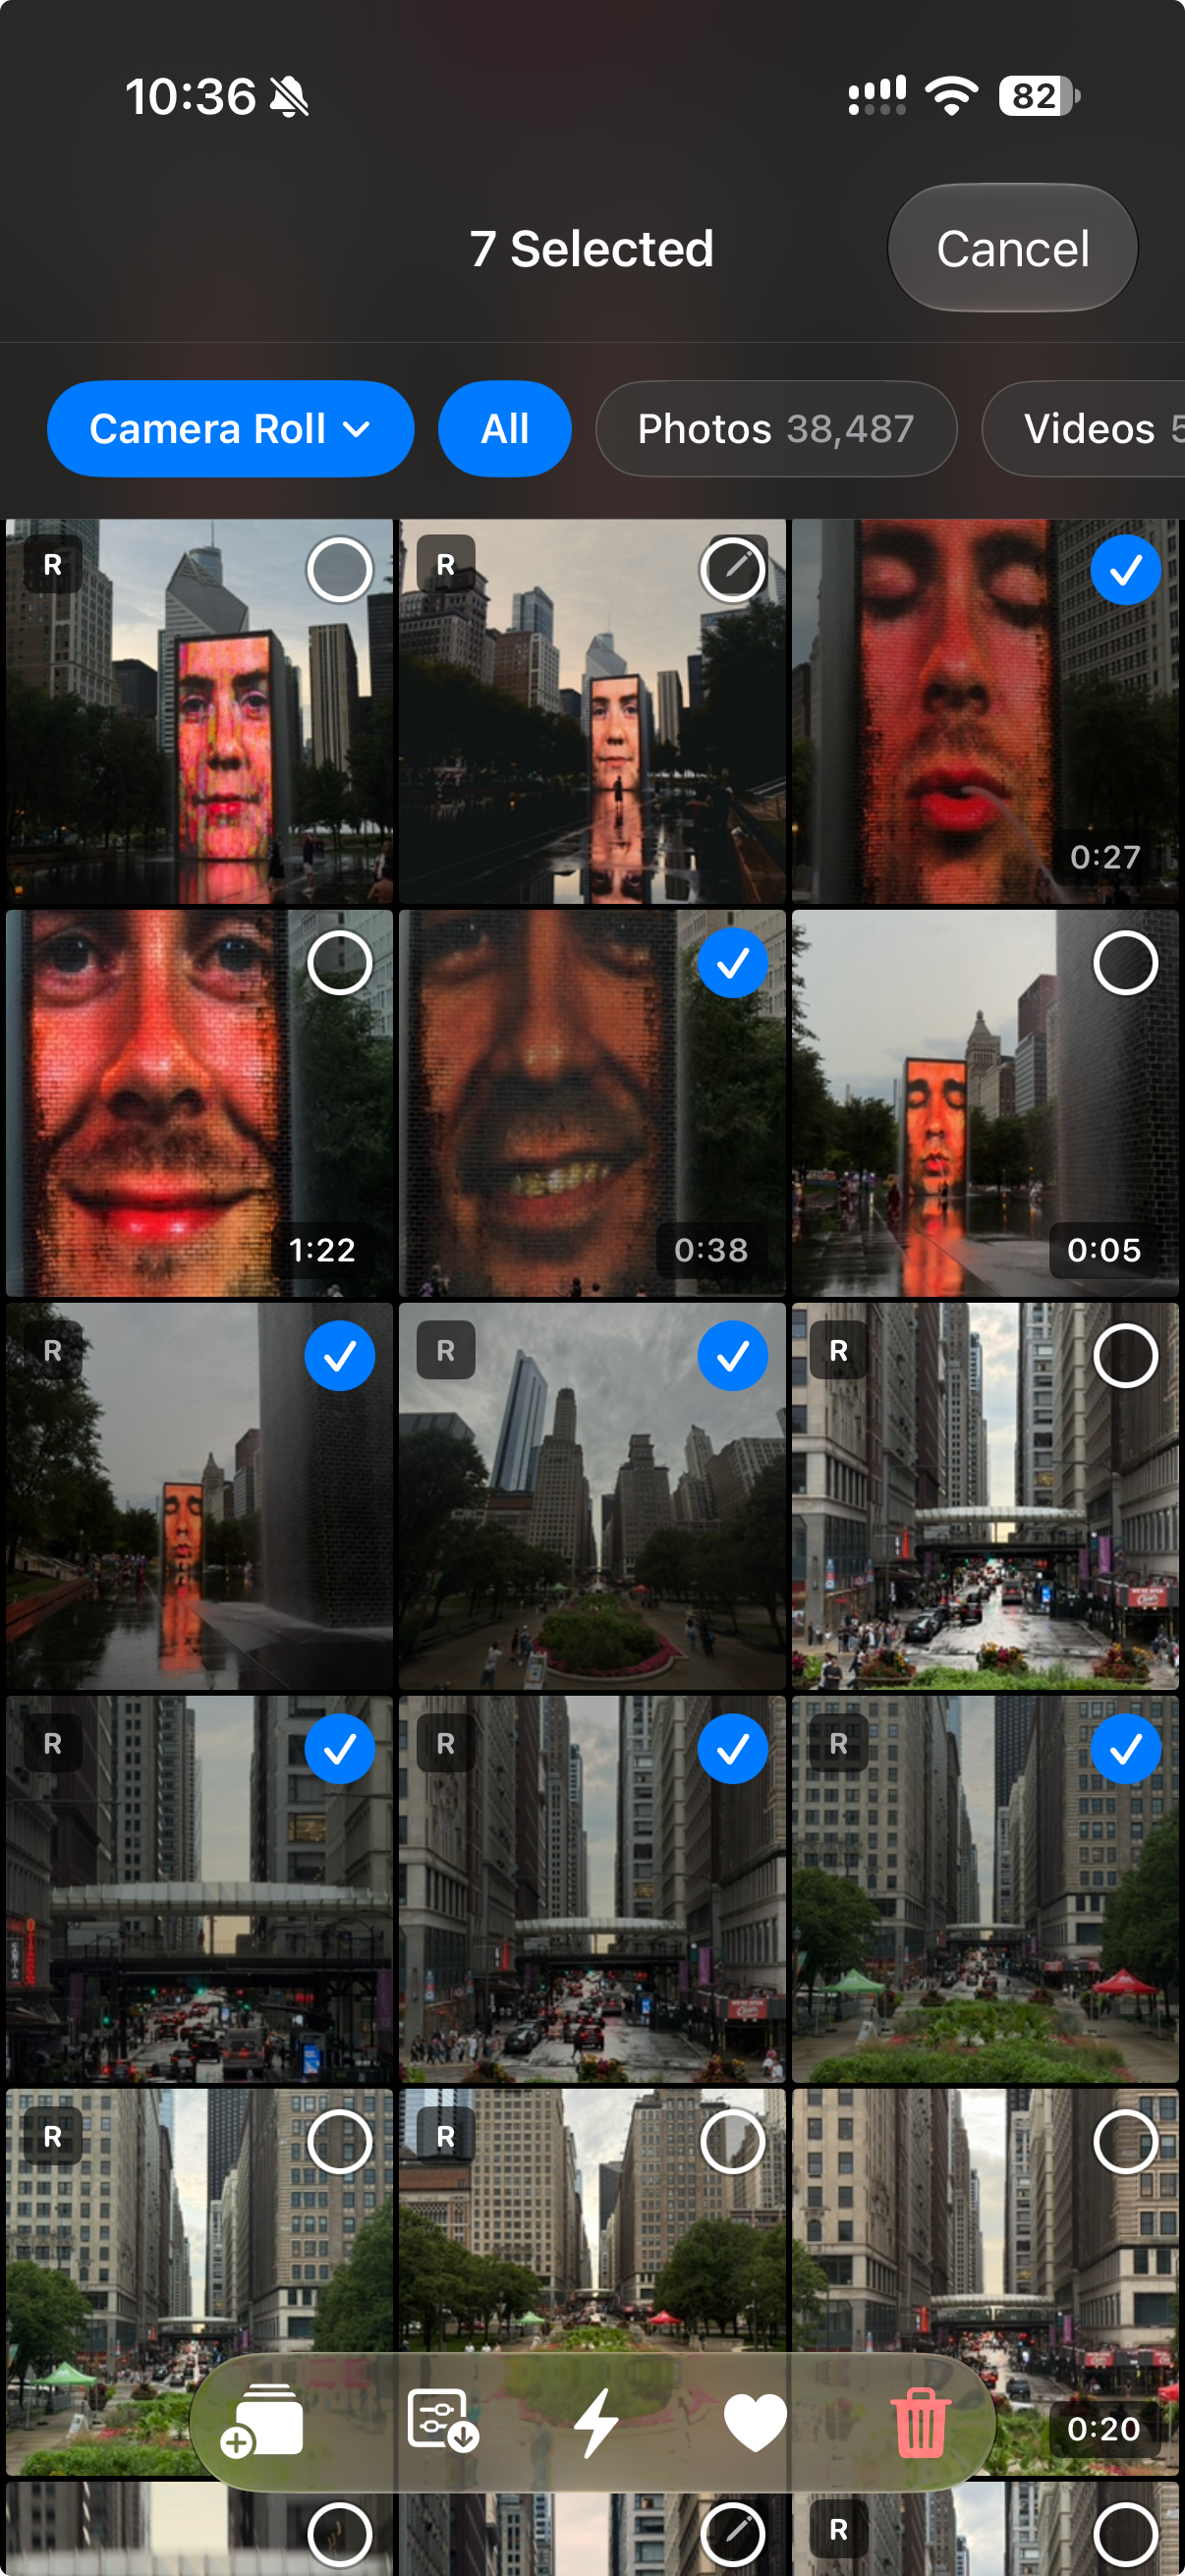
Work with the media you already have
Remjet's Photos-backed Library lets you browse existing photos and videos and open them for editing. Collections organize access to albums, shared albums, and media types. Icon and list presentations and section reordering help you arrange the browser around the way you find material.
The gallery provides adjustable grid density and a detail view for inspecting an item. Use the metadata view when you need to check the source before choosing an edit or an export. A thumbnail is a useful visual index, but it does not tell the whole story of a file's capture settings or dimensions.
Keeping selection and editing together is particularly useful after a shoot. You can compare material, choose a set, apply a repeatable treatment, and start a project without rebuilding your selection in a separate editor.
Batch adjustments and organization
Selection actions include applying a preset, pasting copied adjustments, marking favorites, managing album membership, and deleting items. Copy/paste adjustments gives you a way to reuse an editing recipe rather than manually matching every slider again. Pasting copied edits to multiple items requires Remjet Pro.
Use a representative image to establish the treatment, apply it to the selection, then inspect the results. Consistent settings do not necessarily produce matching exposure or color when the source lighting changes. Batch work gives you a starting point for a set; individual correction finishes the match.
Removing an item from an album and deleting the underlying media are different operations. Read the action for the current selection context, particularly when organizing a set that you will later use in a project.
Start a creation from a selection
Selected media can become a video project, slideshow, collage, or location pin. A collage accepts two to nine items. Choose the sources with the intended result in mind: a coherent set of shapes for a collage, or an ordered visual story for a timeline.
A Photos asset and a file on external storage are different Library sources. The external-storage section explains why the same set of actions is not available for both.
Photo editing: tone, color, detail, and geometry
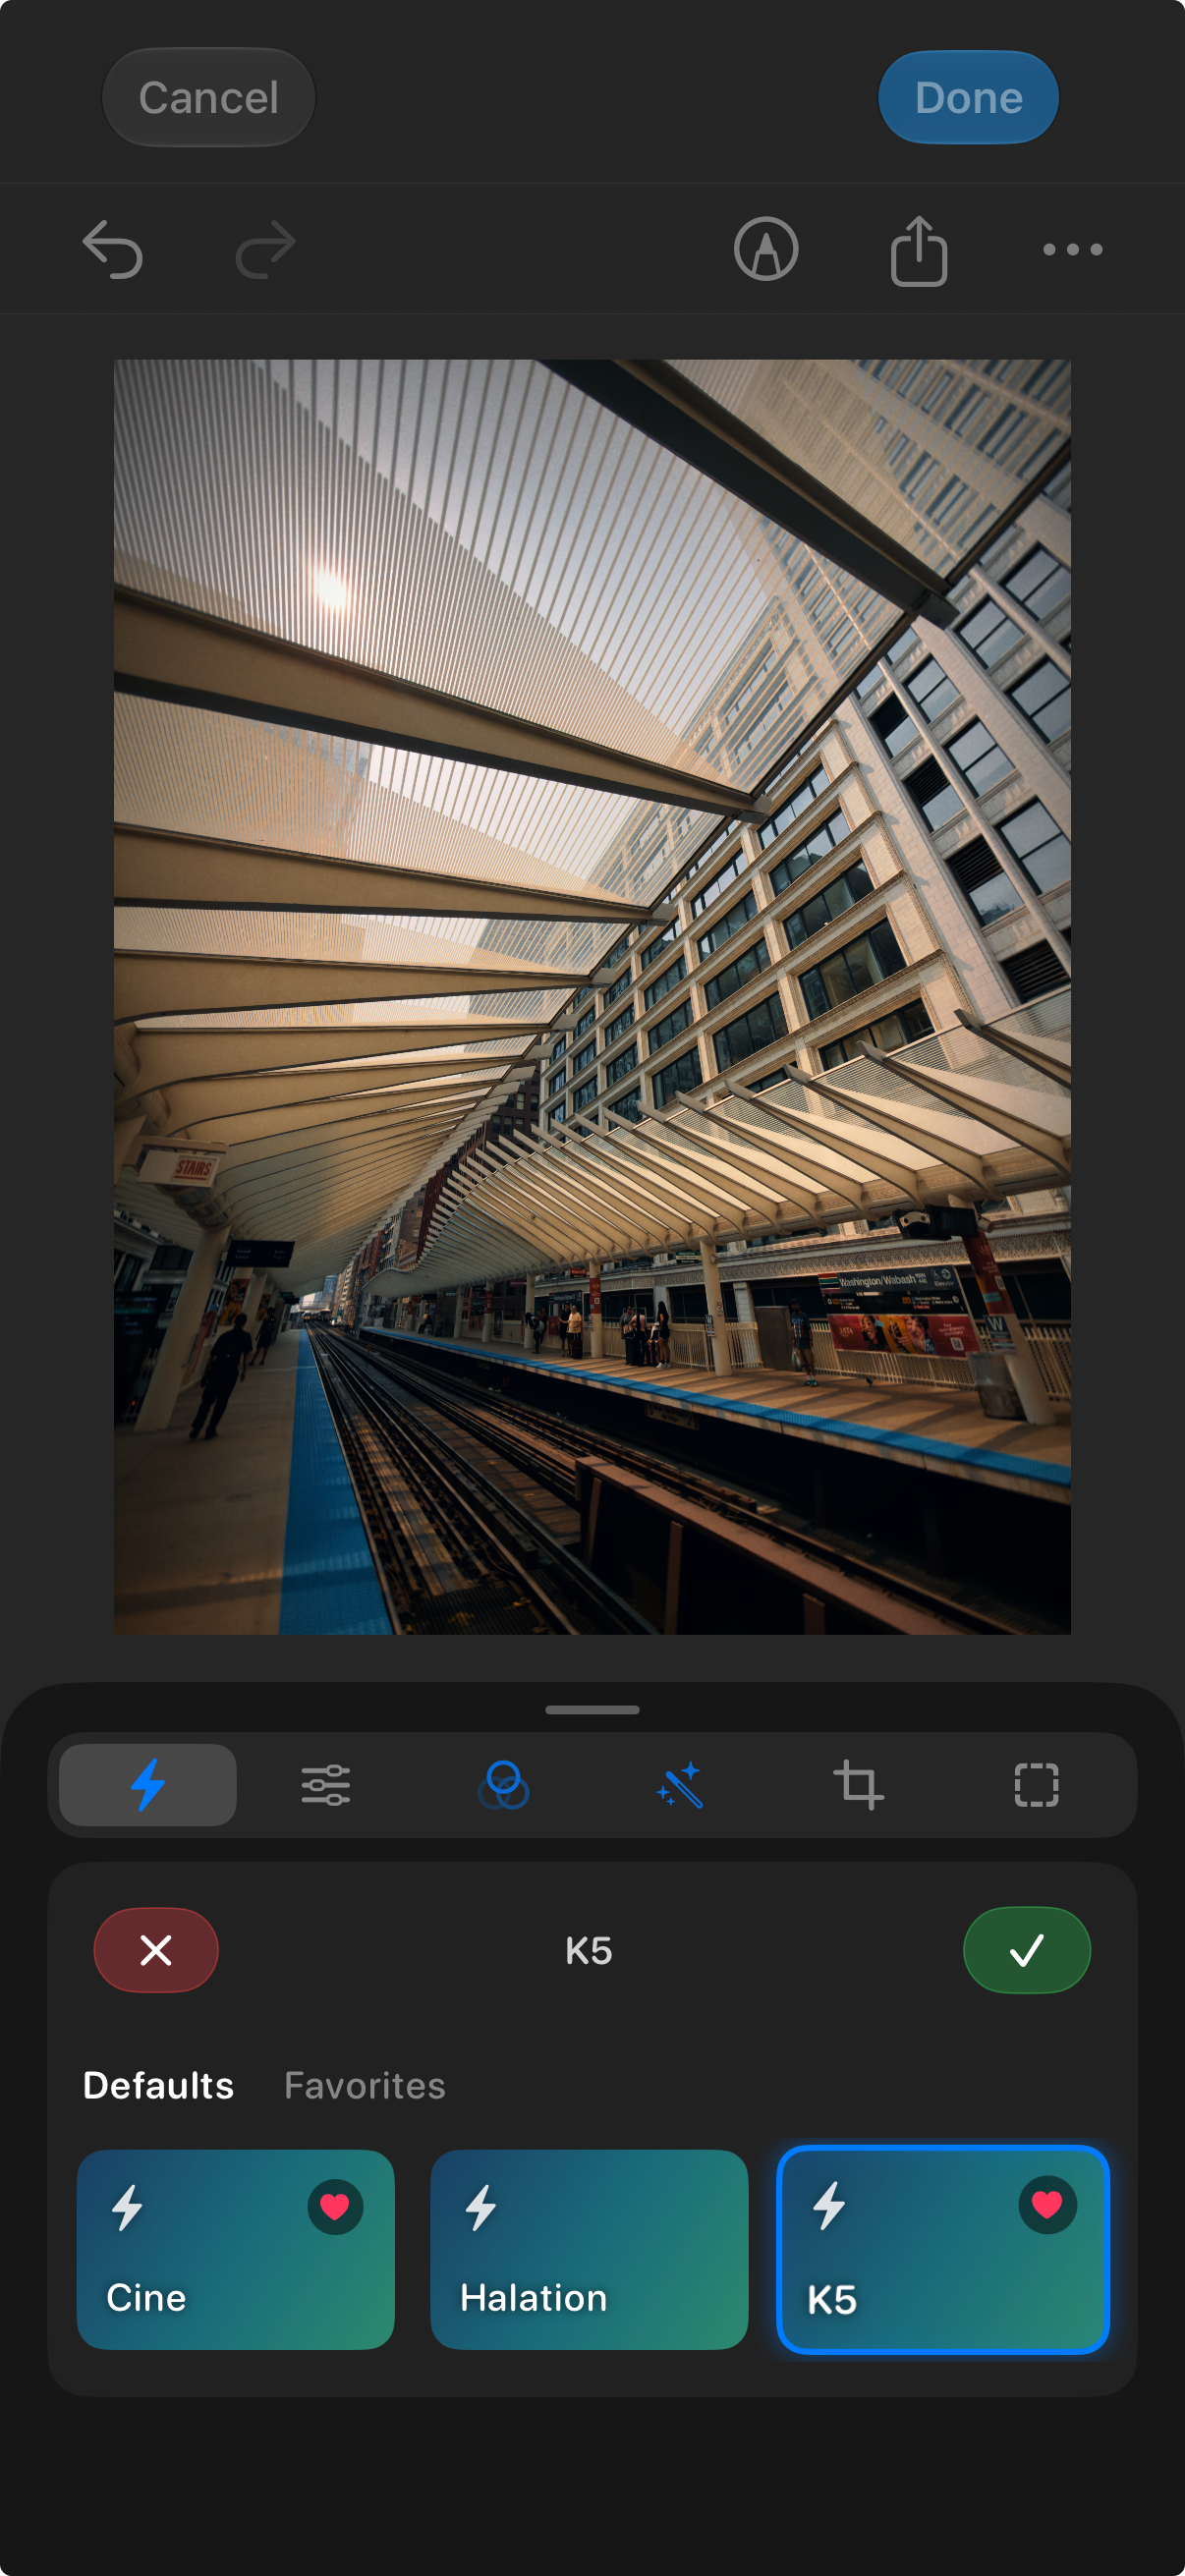
Presets and tonal adjustment
Presets give you a repeatable starting treatment. After choosing one, use the adjustment panels to fit that treatment to the source. A preset should support the photograph's lighting and subject rather than substitute for checking them.
Exposure, Highlights, Shadows, Brightness, Contrast, and Black Point shape the tonal structure. Exposure and brightness influence the overall image; highlights and shadows let you concentrate on different tonal regions; contrast and black point help establish separation and the depth of the darkest areas. Work in small steps and inspect the effect on important transitions.
Clarity, its Range control, Texture, and Sharpen address local detail and definition. They have different visual consequences from changing global contrast. Check fine detail at a useful magnification and then return to the full image: a setting that looks impressive on a small crop may make the complete frame feel too harsh.
Curves provide another way to shape tonal relationships. Rather than changing every brightness range equally, adjust the curve to control how different input tones map into the result. Revisit the black and highlight regions after making a strong curve adjustment.
RAW development controls
On supported RAW sources, the development panels expose additional controls such as Temperature, Tint, Local Tone Map, Noise Reduction, Color Noise, Sharpness, Moiré Reduction, and Lens Correction where available.
These belong to the source-development workflow. They are not a promise of identical controls on an already processed JPEG. Correct the source's basic color and detail behavior before making a strong creative treatment, and check fine patterns when using moiré or sharpening controls.
Color, HSL, and grading wheels
Vibrance and Saturation shape overall color intensity. Temperature and Tint adjust balance. HSL adds more selective control: work with Hue, Saturation, and Brightness for color ranges using the available slider and curve views.
Color grading divides attention between shadows, midtones, highlights, and a global treatment. The wheels, luminance controls, and balance control let you consider color in relation to tonal placement. A warm highlight treatment and a cooler shadow treatment can have a different effect from moving the whole photograph's white balance.
Check skin, neutral surfaces, and smooth gradients as you work. These are useful references for whether a color decision feels intentional across the image, especially when combining HSL adjustments with a LUT and tonal grading.
Log recovery and creative LUTs
Log Color Recovery selects an interpretation for a supported Log source. Choose the profile that matches the footage. Creative LUTs supply another color treatment, with intensity control to blend the result into the edit.
LUT import and group management help you organize a working collection. Remjet's recovery profiles include several camera families, but the presence of an input profile does not mean the iPhone captures that manufacturer's format. It means the editor has a conversion choice for appropriate source material.
A practical order is to establish the source interpretation, correct the base image, then judge the creative treatment. If the result looks unexpectedly contrasty or oddly colored, check the input profile before trying to compensate with more grading.
Crop, perspective, frames, and annotations
Crop choices include Original, Freeform, square, and common landscape and portrait ratios. Rotate left or right, flip horizontally or vertically, straighten the frame, or use perspective controls to change the geometry.
Straightening and perspective correction solve different problems. Straightening rotates the frame; perspective controls reshape it. Check important edges and the subject's proportions after a correction, then make the final crop.
Frame controls offer another presentation decision, while annotations let you add marks to the image. Annotation inclusion has an explicit export setting. The histogram, Undo, Redo, and Revert to Original support inspection and revision as the edit develops.
Film effects: halation, bloom, grain, and lens character
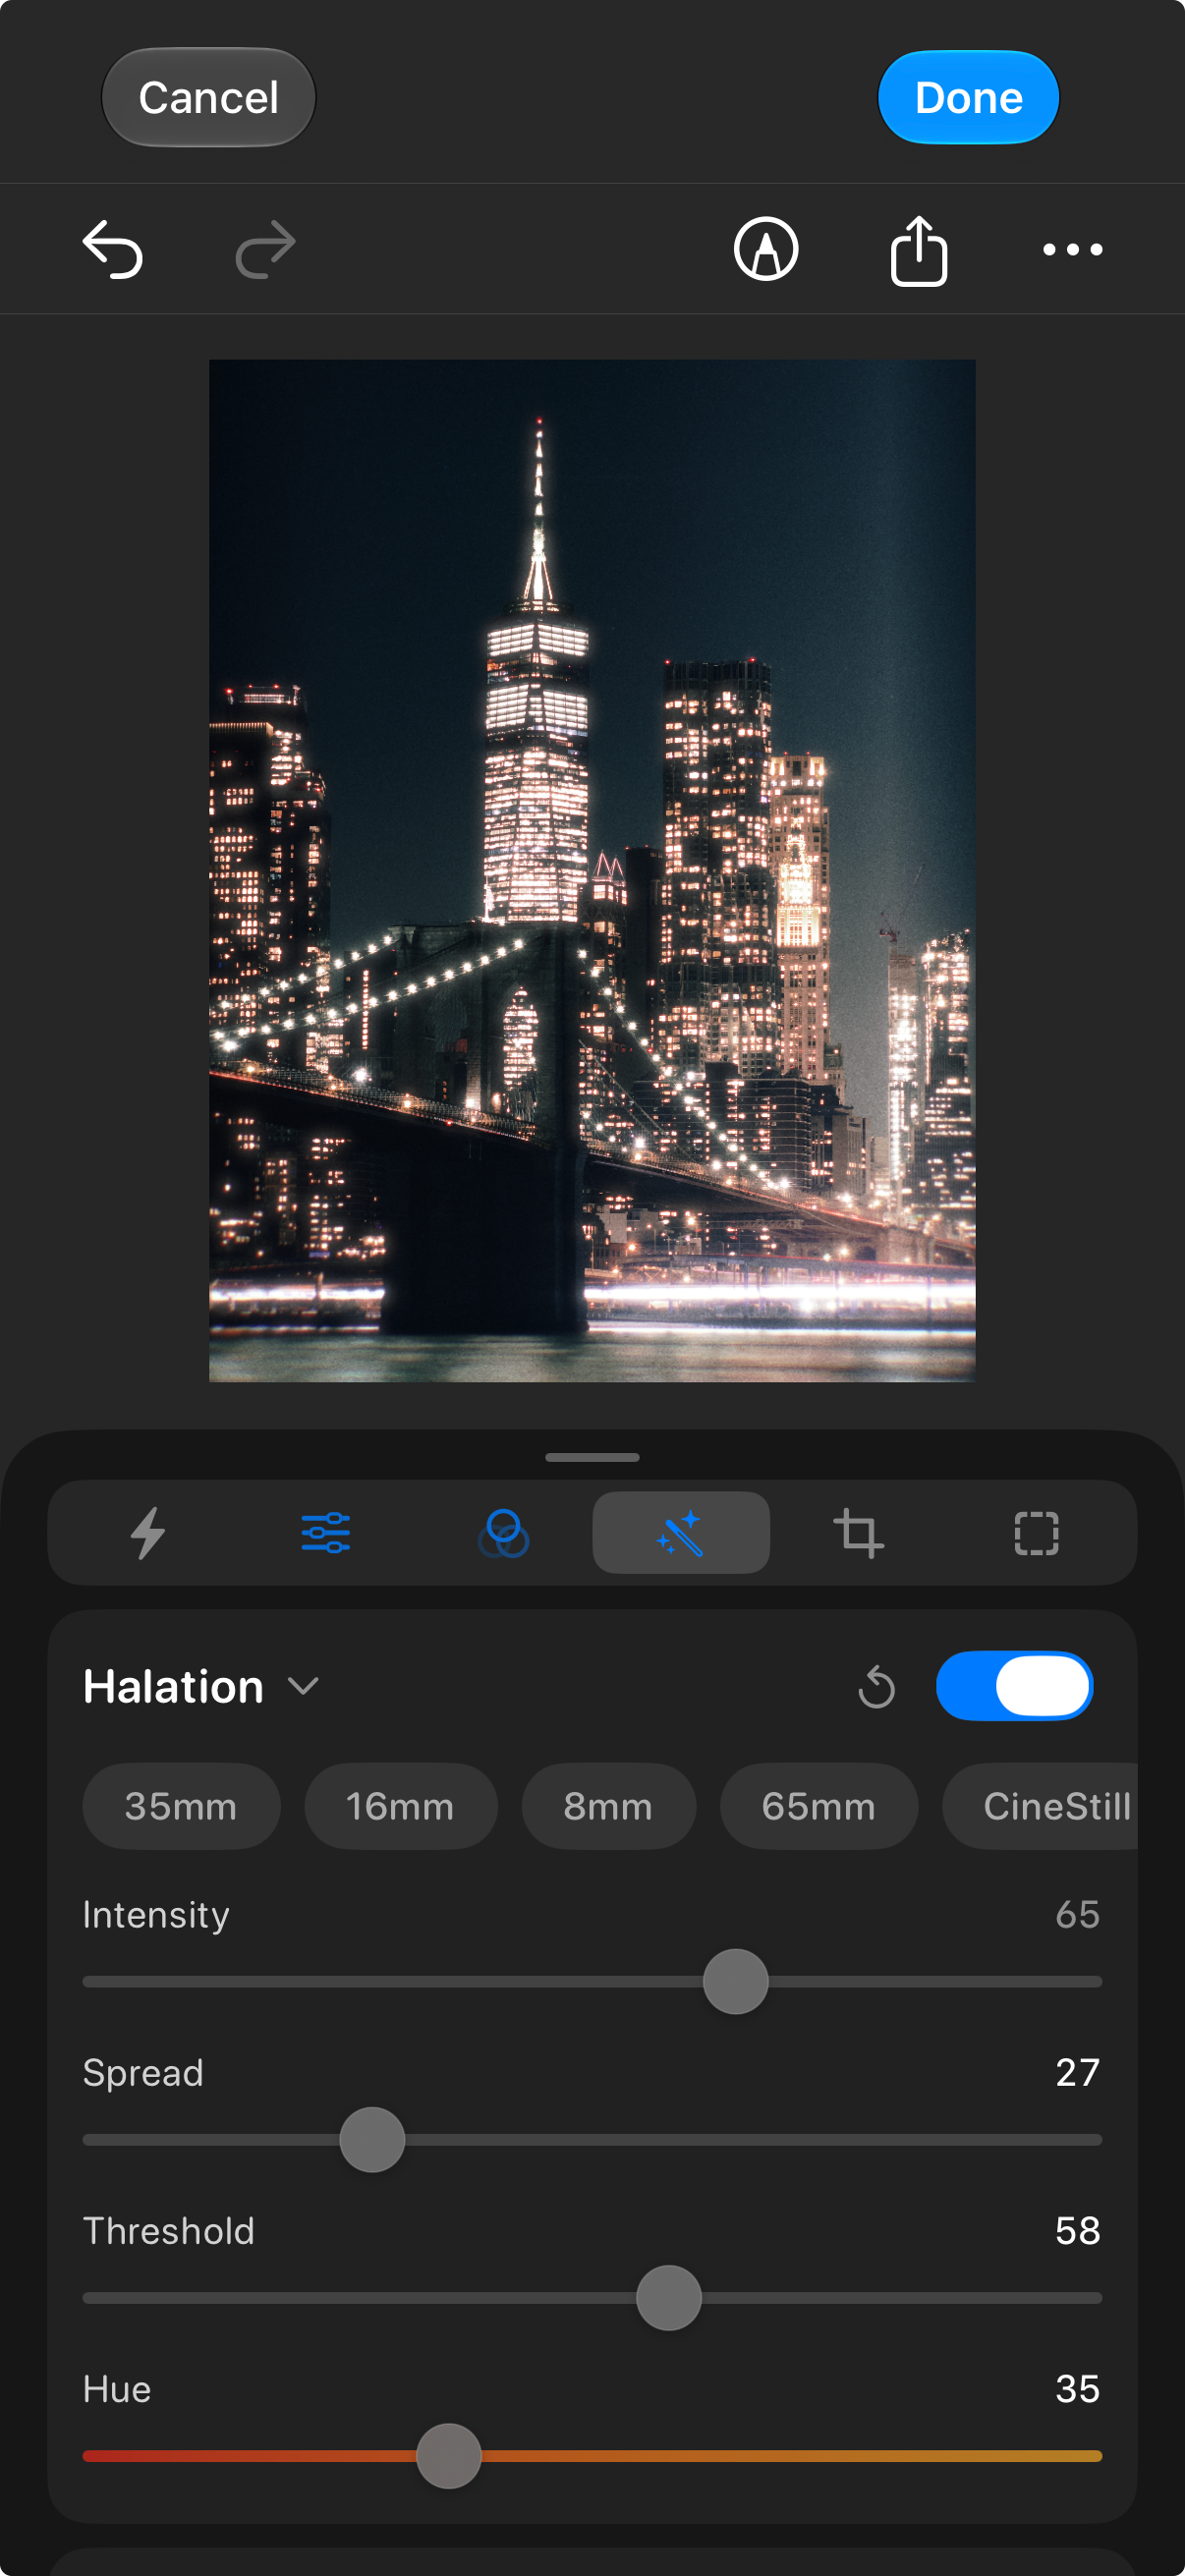
Halation and bloom
Halation has Intensity, Spread, Threshold, and color controls. Intensity changes the strength, spread changes the extent, and threshold affects which bright regions drive the treatment. Start with a source that contains distinct bright edges so you can judge where the effect appears.
Bloom offers Intensity, Spread, Threshold, Softness, and Highlight Protection. Use it to shape a softer glow around bright regions, checking that the treatment does not remove separation that the subject needs. Halation and bloom can work together, but inspect them separately before deciding on their combined strength.
Vignette and lens distortion
Vignette includes Amount, Midpoint, Roundness, Feather, and Highlights. These controls let you shape the edge treatment rather than simply darkening every corner by the same amount. Compare the result on an image with important material close to the border.
Lens Distortion effects include Blur, Aberration, Distortion, Swirl, and Midpoint. They supply stylized lens character; they are a different creative decision from correcting a lens in the RAW development panel.
Grain and the finished frame
Grain adds texture, with selectable treatments and intensity control. Additional grain overlays are available through the downloadable pack. Judge grain at the intended delivery size as well as in a closer view: resizing and compression affect how texture reads.
A useful finishing pass is to turn each effect off and on and ask what it contributes. Remjet retains the editing decisions so you can return to the balance later. Saving work that uses Pro effects or creative LUT features requires the applicable Pro access.
Single-video editing: finish a clip
The single-video editor is for refining one source clip. Trim its useful interval, adjust playback speed, set volume, and shape its color and effects without first assembling a multi-clip sequence.
Trim determines the part of the source that belongs in the result. Speed changes how that material plays over time, with regular and curve-based controls for different treatments. A speed curve varies the pace across the clip rather than applying one rate throughout. Review the beginning and end of each change in playback, not just the most dramatic middle section.
Volume controls the clip's sound level. Listen to the edited result when changing timing or audio settings; visual inspection alone cannot establish that the soundtrack works. Use a video project when you need to build a separate music or narration arrangement around the picture.
The editor provides preset, adjustment, color, and effect tools alongside its clip-specific controls. Use a matching Log recovery profile where appropriate, make the base corrections, and then refine the look. Frame and annotation decisions are part of the finish as well.
Undo, Redo, copied adjustments, and Revert to Original support revision. Done saves the edit non-destructively to the Photos asset; exporting creates a separate deliverable. A later change to the editable source does not revise a copy you already exported.
Video projects: picture, text, music, and voiceover
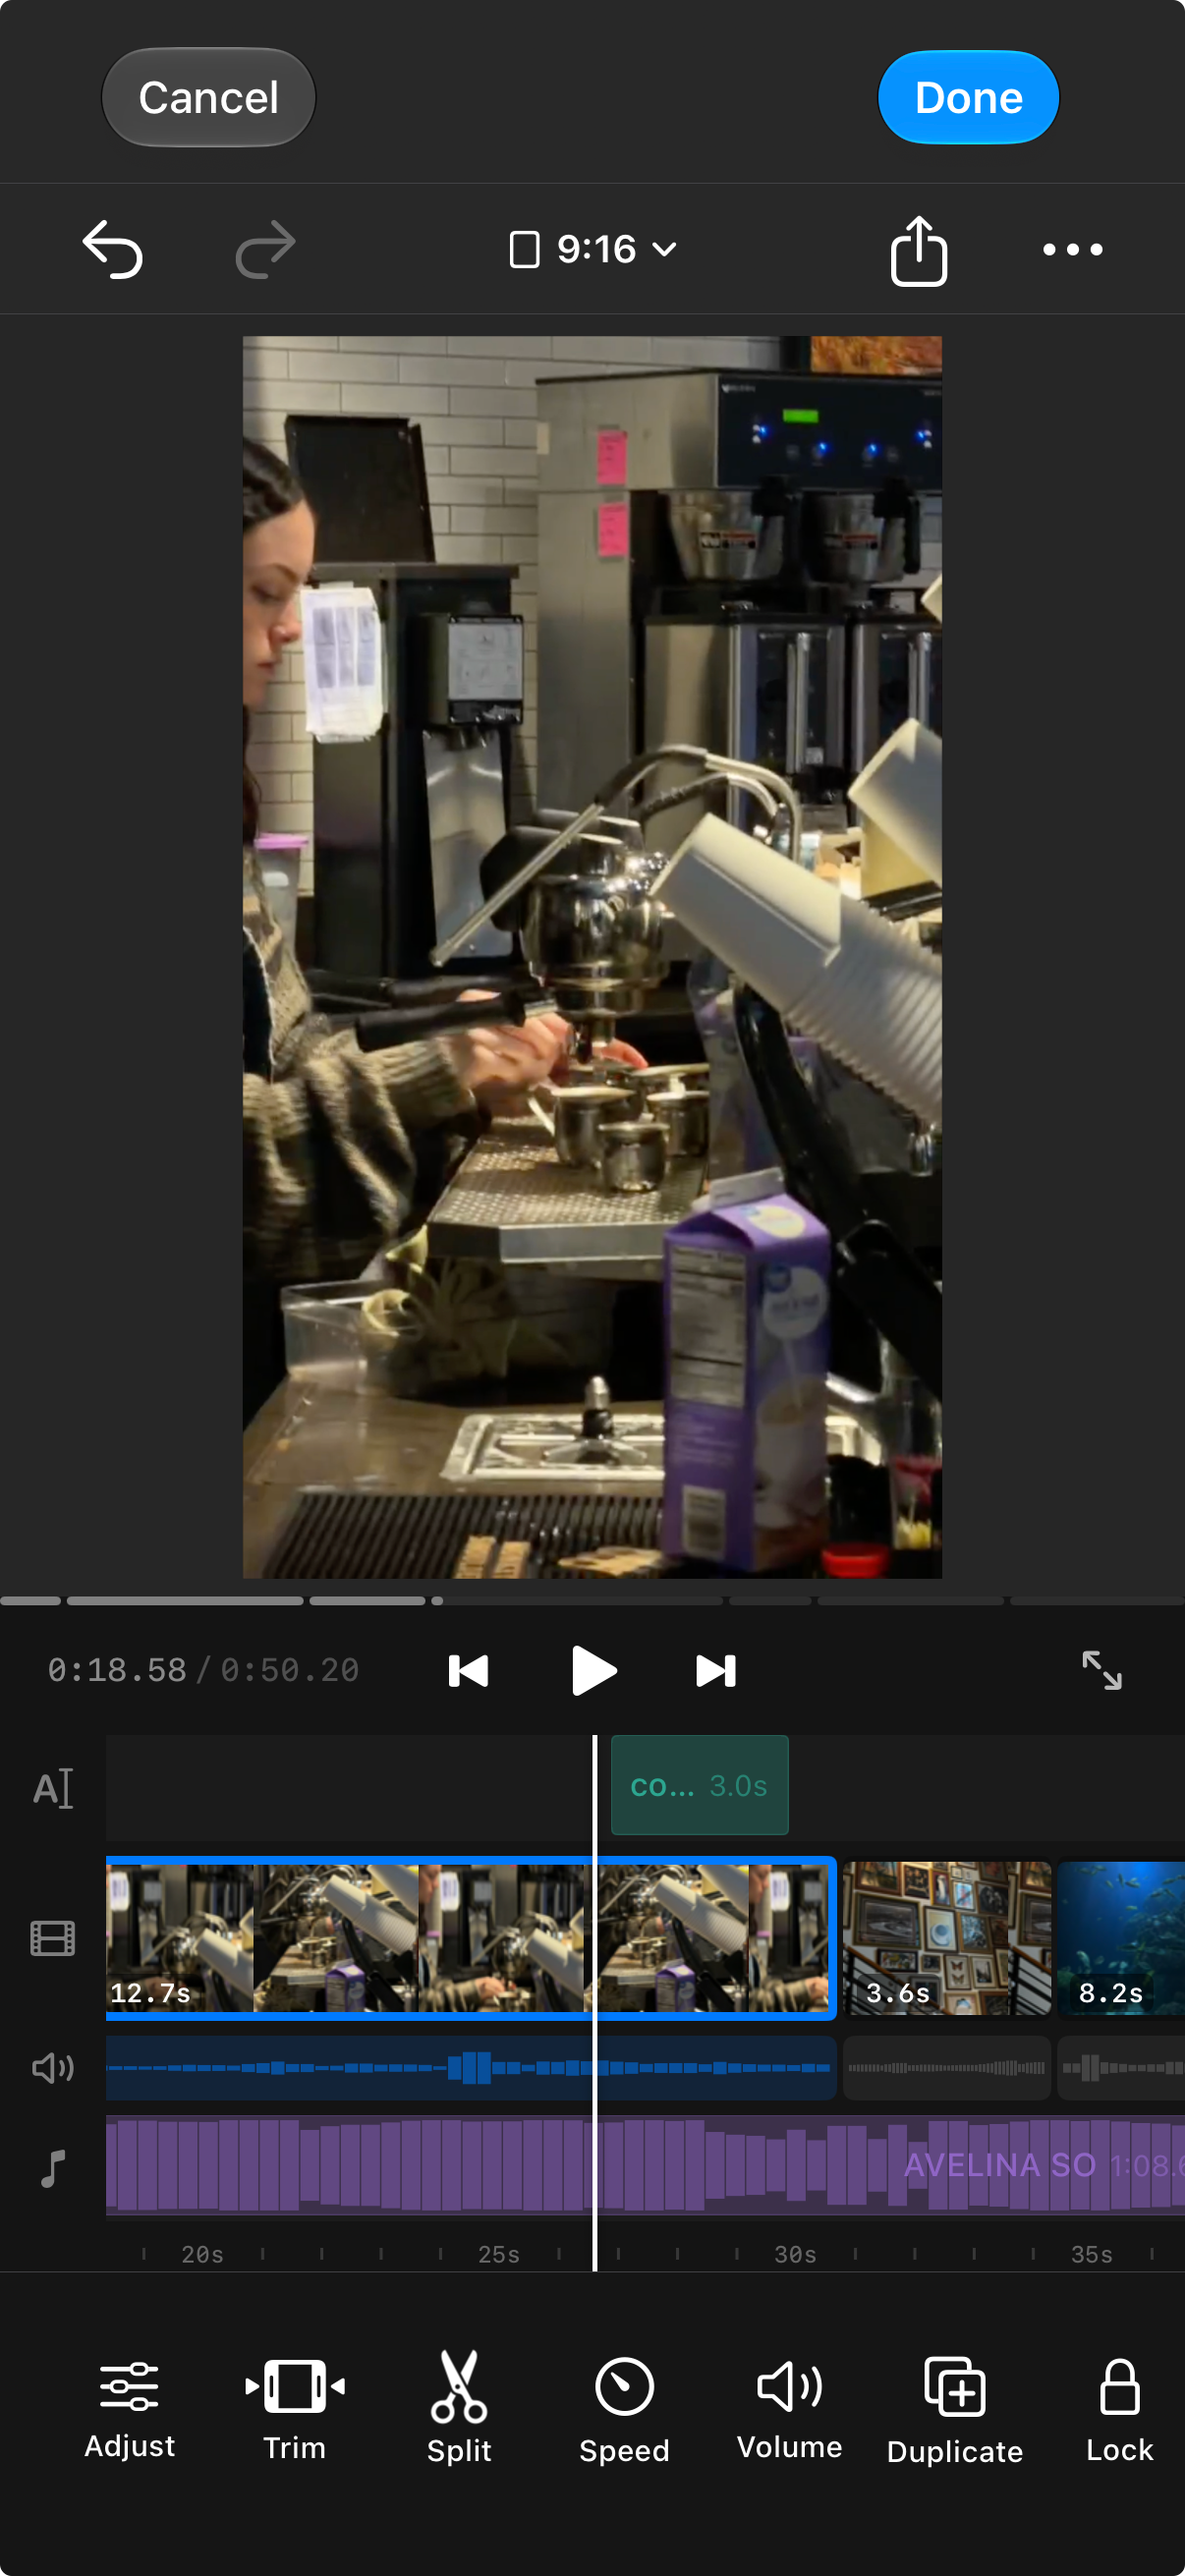
Build and revise the timeline
A video project organizes clips into a sequence with additional layers for overlays, text, audio, and adjustments. The playhead establishes the moment you are inspecting, while selection determines which item the editing actions affect.
Trim changes a clip's used interval. Split creates an edit at a point in the sequence. Duplicate reuses an item; Delete removes it from the project; Lock protects an item from changes while you work around it. Reordering and timing let you revise the sequence without treating the first assembly as final.
Use the preview to judge the relationship between cuts, movement, and sound. Fullscreen playback helps you evaluate the result without the timeline competing for attention. Return to the editing view when a transition or a title needs closer adjustment.
Per-clip framing and compositing
Scale, rotate 90 degrees, flip, and background controls change how a clip occupies the frame. Overlays let one visual element sit with another. Opacity and Blend Mode affect how the selected element combines with what is beneath it.
Per-clip adjustments let you correct a source within the project, while adjustment segments provide a separate timeline element for a treatment. Keep the distinction in mind when matching shots: correcting an individual clip and treating a portion of the composition are different editing operations.
Positioning and alignment guides help with deliberate placement. Work from the final canvas shape when placing a title or an overlay, then check the entire sequence for elements that collide with the frame edge.
Timing and speed curves
Regular speed applies a consistent retiming treatment; curve mode changes speed through the clip. The source's trimmed duration and the resulting playback duration are related but not interchangeable. A retime can change where later material sits relative to sound and text.
Review timing after changing speed, particularly when a cut is meant to land on a musical beat or a spoken word. The graph is a control surface; playback is where you judge the result.
Text and typography
Text segments belong to the timeline, so their timing is separate from the picture beneath them. Edit the text, then split, duplicate, lock, or delete a text segment as the sequence requires.
Typography controls include font selection, size, case, letter spacing, and line spacing. Stroke, background, shadow, opacity, and blend mode affect how text reads over the picture. Font import and group management let you organize type choices alongside the edit.
Choose styling for readability over the actual moving background. A title that reads clearly on one frame may become difficult over a bright subject a second later. Inspect the whole duration of the segment and avoid relying on an excessively heavy shadow to rescue placement.
Music and audio management
The audio picker provides a library of imported audio files, with preview, search, renaming, groups, and deletion. Organize material by the way you retrieve it—for example, project, mood, or source—so a reusable audio library stays useful across edits.
Once added to the project, an audio segment has timeline editing actions including split, duplicate, lock, and delete, plus volume control. Clip audio and added audio are separate parts of the mix. Adjust their relationship while listening to the picture, especially when speech needs to remain intelligible.
Imported music is your source material; importing it does not grant distribution rights. Choose audio you can use for the intended delivery.
Voiceover
Voiceover records narration into the project with microphone access and a recording countdown. Use the timeline position to establish where the narration belongs, record the passage, and review the resulting audio in context.
A short rehearsal helps match the words to the available picture. After recording, inspect the placement and volume of the audio segment rather than assuming the take is finished as soon as recording stops.
Save an editable project, export a standalone video
Done saves the project and creates a Library result associated with its editable composition. Save to Device creates a standalone video through the export workflow. These have different purposes: one lets you continue the project in Remjet, while the other is a finished output for use elsewhere.
Keep the source media available while you still need to revise the composition. A rendered video is not a substitute for all of the source clips, timing, text, and audio decisions in an editable project.
Collages: layout, framing, borders, and a shared look
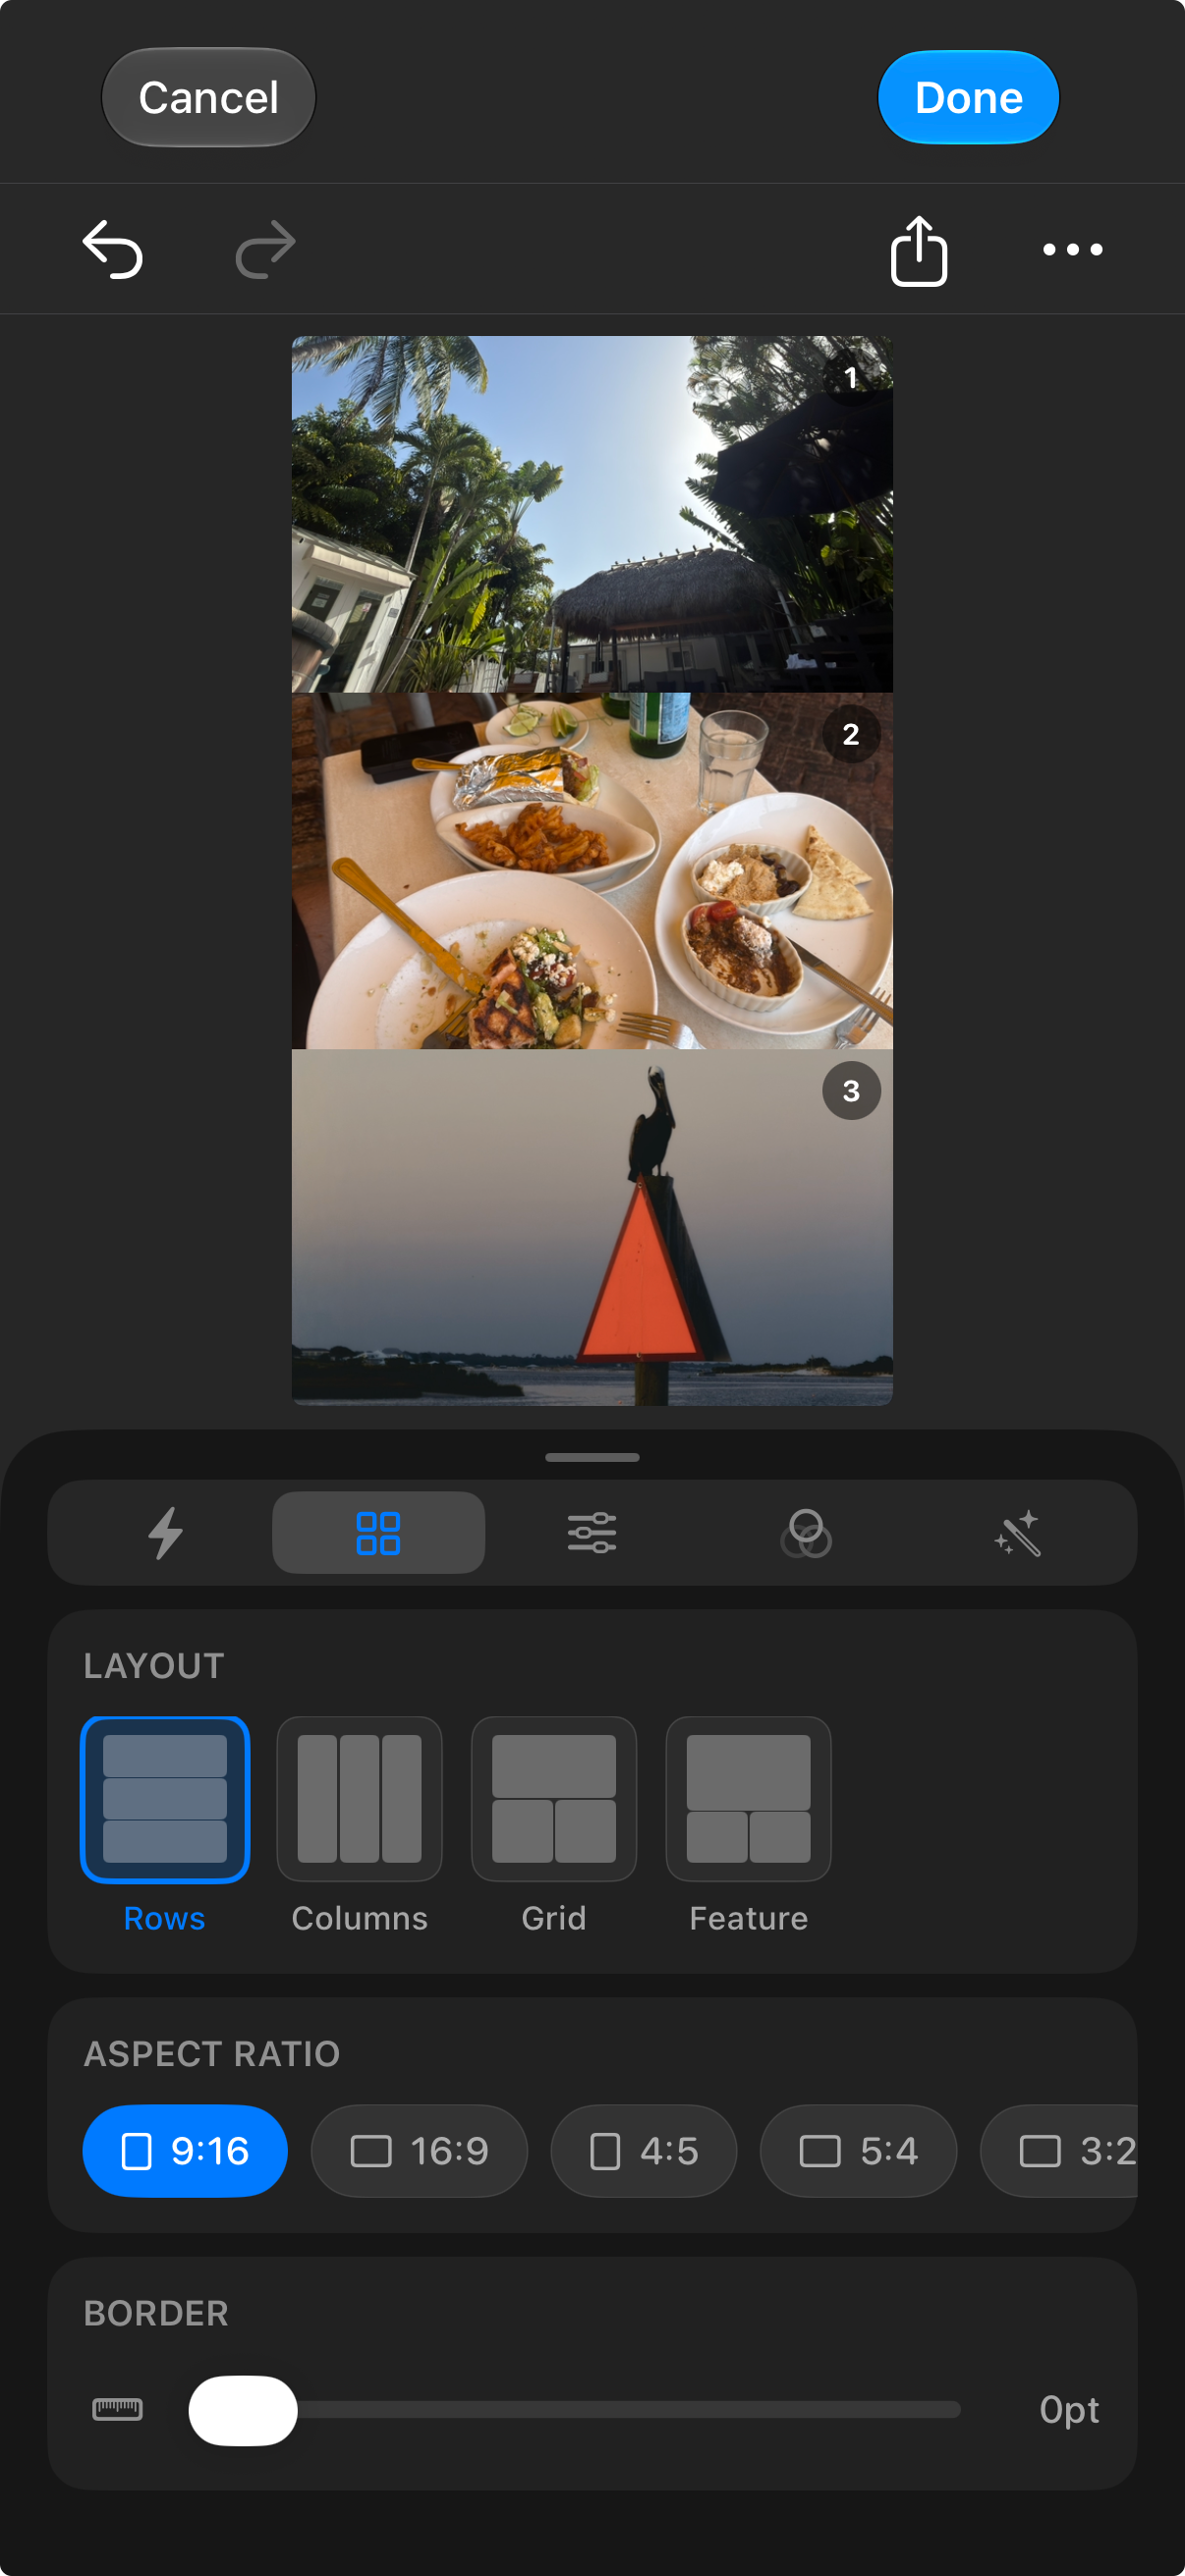
A collage begins with two to nine selected photos or videos. Rows, Columns, Grid, and Feature layouts offer different ways to distribute the material. Choose a layout that suits the sources instead of forcing every image into the same shape.
Aspect-ratio options include 9:16, 16:9, 4:5, 5:4, 3:2, 2:3, 4:3, 3:4, and 1:1. Reposition material within its cell and reorder cells to change the visual balance. The border controls set thickness and color, allowing separation to become part of the composition.
Presets, adjustment, color, and effects shape a shared treatment across the collage. These are useful for bringing different sources into a coherent presentation. Cell framing and overall color treatment are separate decisions; the collage's shared treatment should not be confused with independent grading for each cell.
Video-containing compositions have playback and audio controls in the editor. The still-image export described here produces a rendered collage image. Treat moving previews and exported output as separate parts of the workflow when choosing how to present the result.
Undo, Redo, Reset All, and saved collage data let you revise the arrangement. Exporting produces the presentation copy, while retaining the editable collage supports another layout or border choice later. Collage export requires Remjet Pro.
Saving, exporting, and sharing
Non-destructive editing and separate copies
For Photos-backed photo and video edits, Done stores the editable adjustments with the asset. Reopen it to continue working, or use Revert to Original to remove the treatment. Undo within a session and reverting a saved edit solve different problems.
Save to Device creates a new finished copy. That output is useful for delivery, but it does not stay linked to future changes in the source edit. Keep the editable source or project if you expect revisions.
External photos use another storage arrangement: a master, a rendered look copy, and an adjacent editing recipe. That workflow is covered in the next section.
Photo export settings
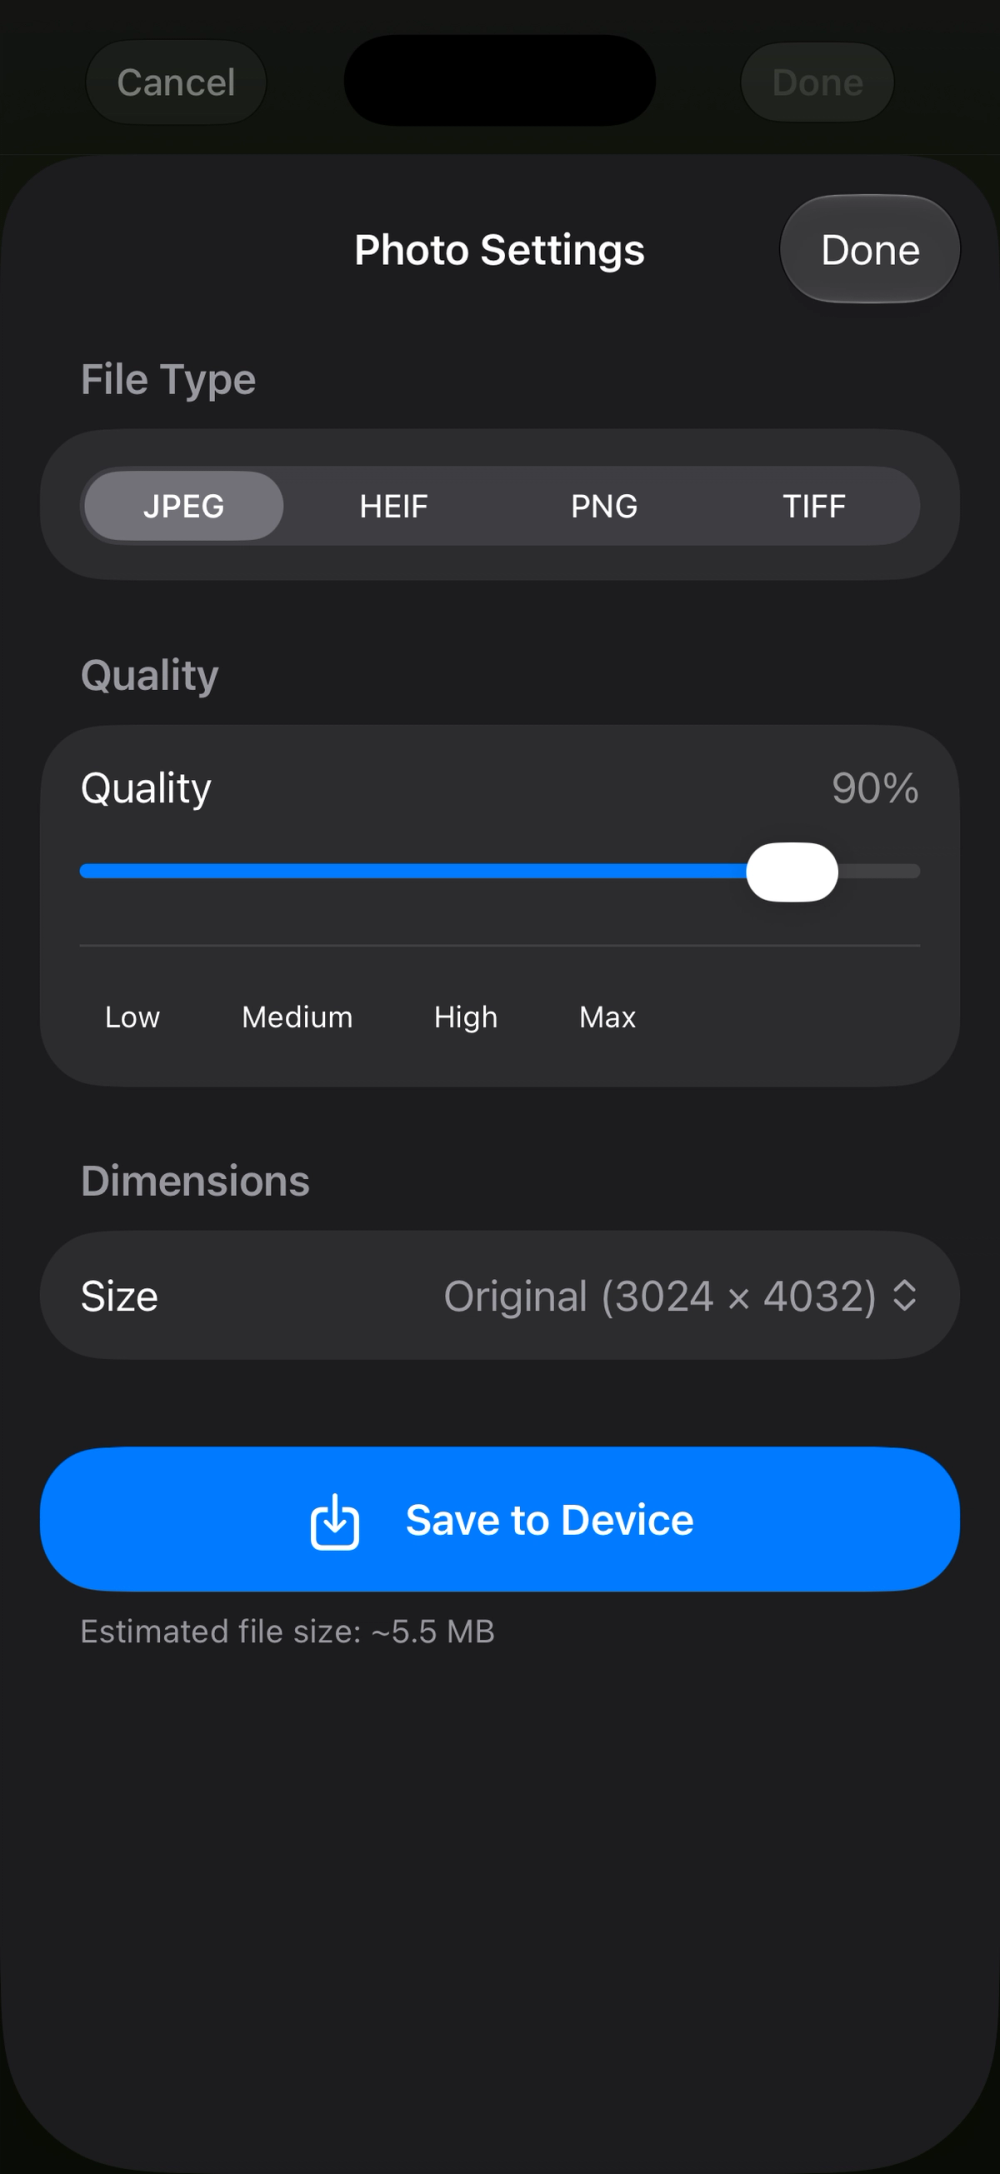
Photo output formats include JPEG, HEIF, PNG, and TIFF. Choose according to what the receiving workflow accepts and how the finished image will be used. Selecting a container does not restore detail that was absent from the source or removed earlier.
Quality controls appear where relevant to the format. Dimensions can remain Original, scale to 50% or 25%, or use Custom width and height. Set dimensions for the actual destination, then inspect fine detail and the composition at that size.
Include Annotations controls whether those marks belong in the output. The estimated file size helps you assess the result before exporting, particularly when choosing dimensions and compression for sharing.
Video export settings
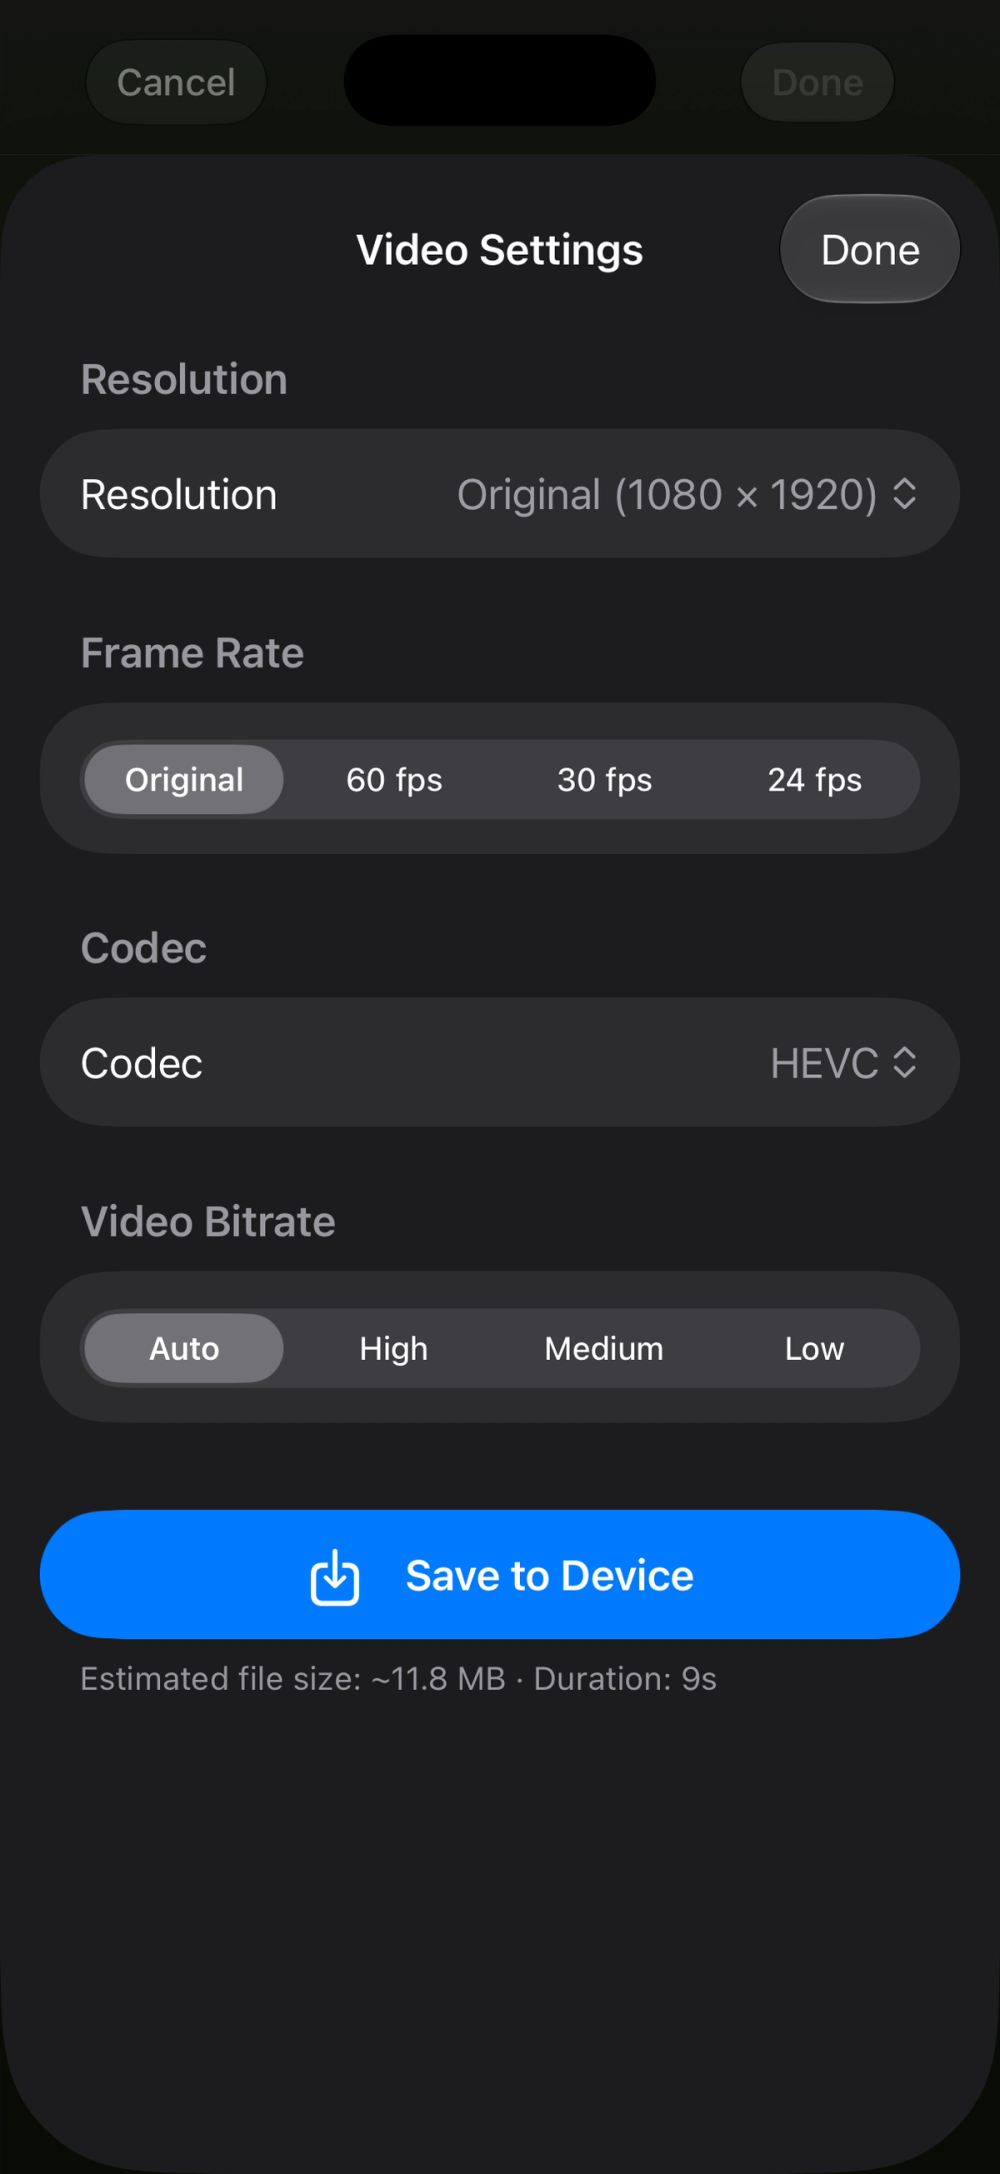
Video output resolution offers Original, 4K, 1080p, and 720p. Frame-rate choices include Original, 60, 30, and 24 fps. These are delivery decisions; they do not create new captured detail or make a retime identical to a different acquisition setting.
Codec choices include HEVC, H.264, ProRes Match, and explicit ProRes 422, HQ, LT, and Proxy options where applicable. Bitrate choices include Auto, High, Medium, and Low. The useful combination depends on the source, the export path, and the destination's requirements.
Check the estimated size and duration, and decide whether annotations should be included. For a video project, review the project export sheet separately from the Done action that retains its editable association in the Library.
A good delivery check is simple: open the actual exported file, watch or inspect it at its intended size, and verify that the framing, timing, sound, and appearance match the result you meant to send.
Instagram and the system share sheet
Remjet provides an Instagram action alongside other sharing choices. It prepares the media and hands off to the installed app; you complete the destination and posting choices there. It is not unattended publishing.
More opens the system sharing workflow for other destinations. If a dedicated destination app is unavailable, Remjet offers a share-sheet alternative in the relevant flow. Review the finished output before completing the handoff, just as you would for a file sent to a client.
External storage: browse files and retain the master
Choose an external folder in the camera's storage settings to direct supported captures there. The storage interface shows connection status and available capacity. A folder authorization and a connected, suitable storage device are part of the setup; check them before recording.
External video capture keeps the clean take and saves the look information beside it. External photos retain a clean source and a graded result. This gives the master and the treatment separate roles in the folder workflow.
The external Library browser lets you inspect connected content, including video playback. Photo edits save a rendered look copy beside the master and a recipe that records the adjustments. Keep the related files together if you want the treatment to remain associated with its source.
External files do not have every capability of a Photos-backed Library asset. In this workflow, external video browsing is separate from the single-video editor used for Photos videos, and Photos-based selection and project actions do not automatically apply to files on a drive.
For demanding recording formats, use storage and a connection suitable for the camera's requirements. Capacity alone does not establish that a device can sustain the selected recording configuration. Check the storage guidance shown in the app and make a test recording with the setup you intend to use.
Light: plan the timing and direction
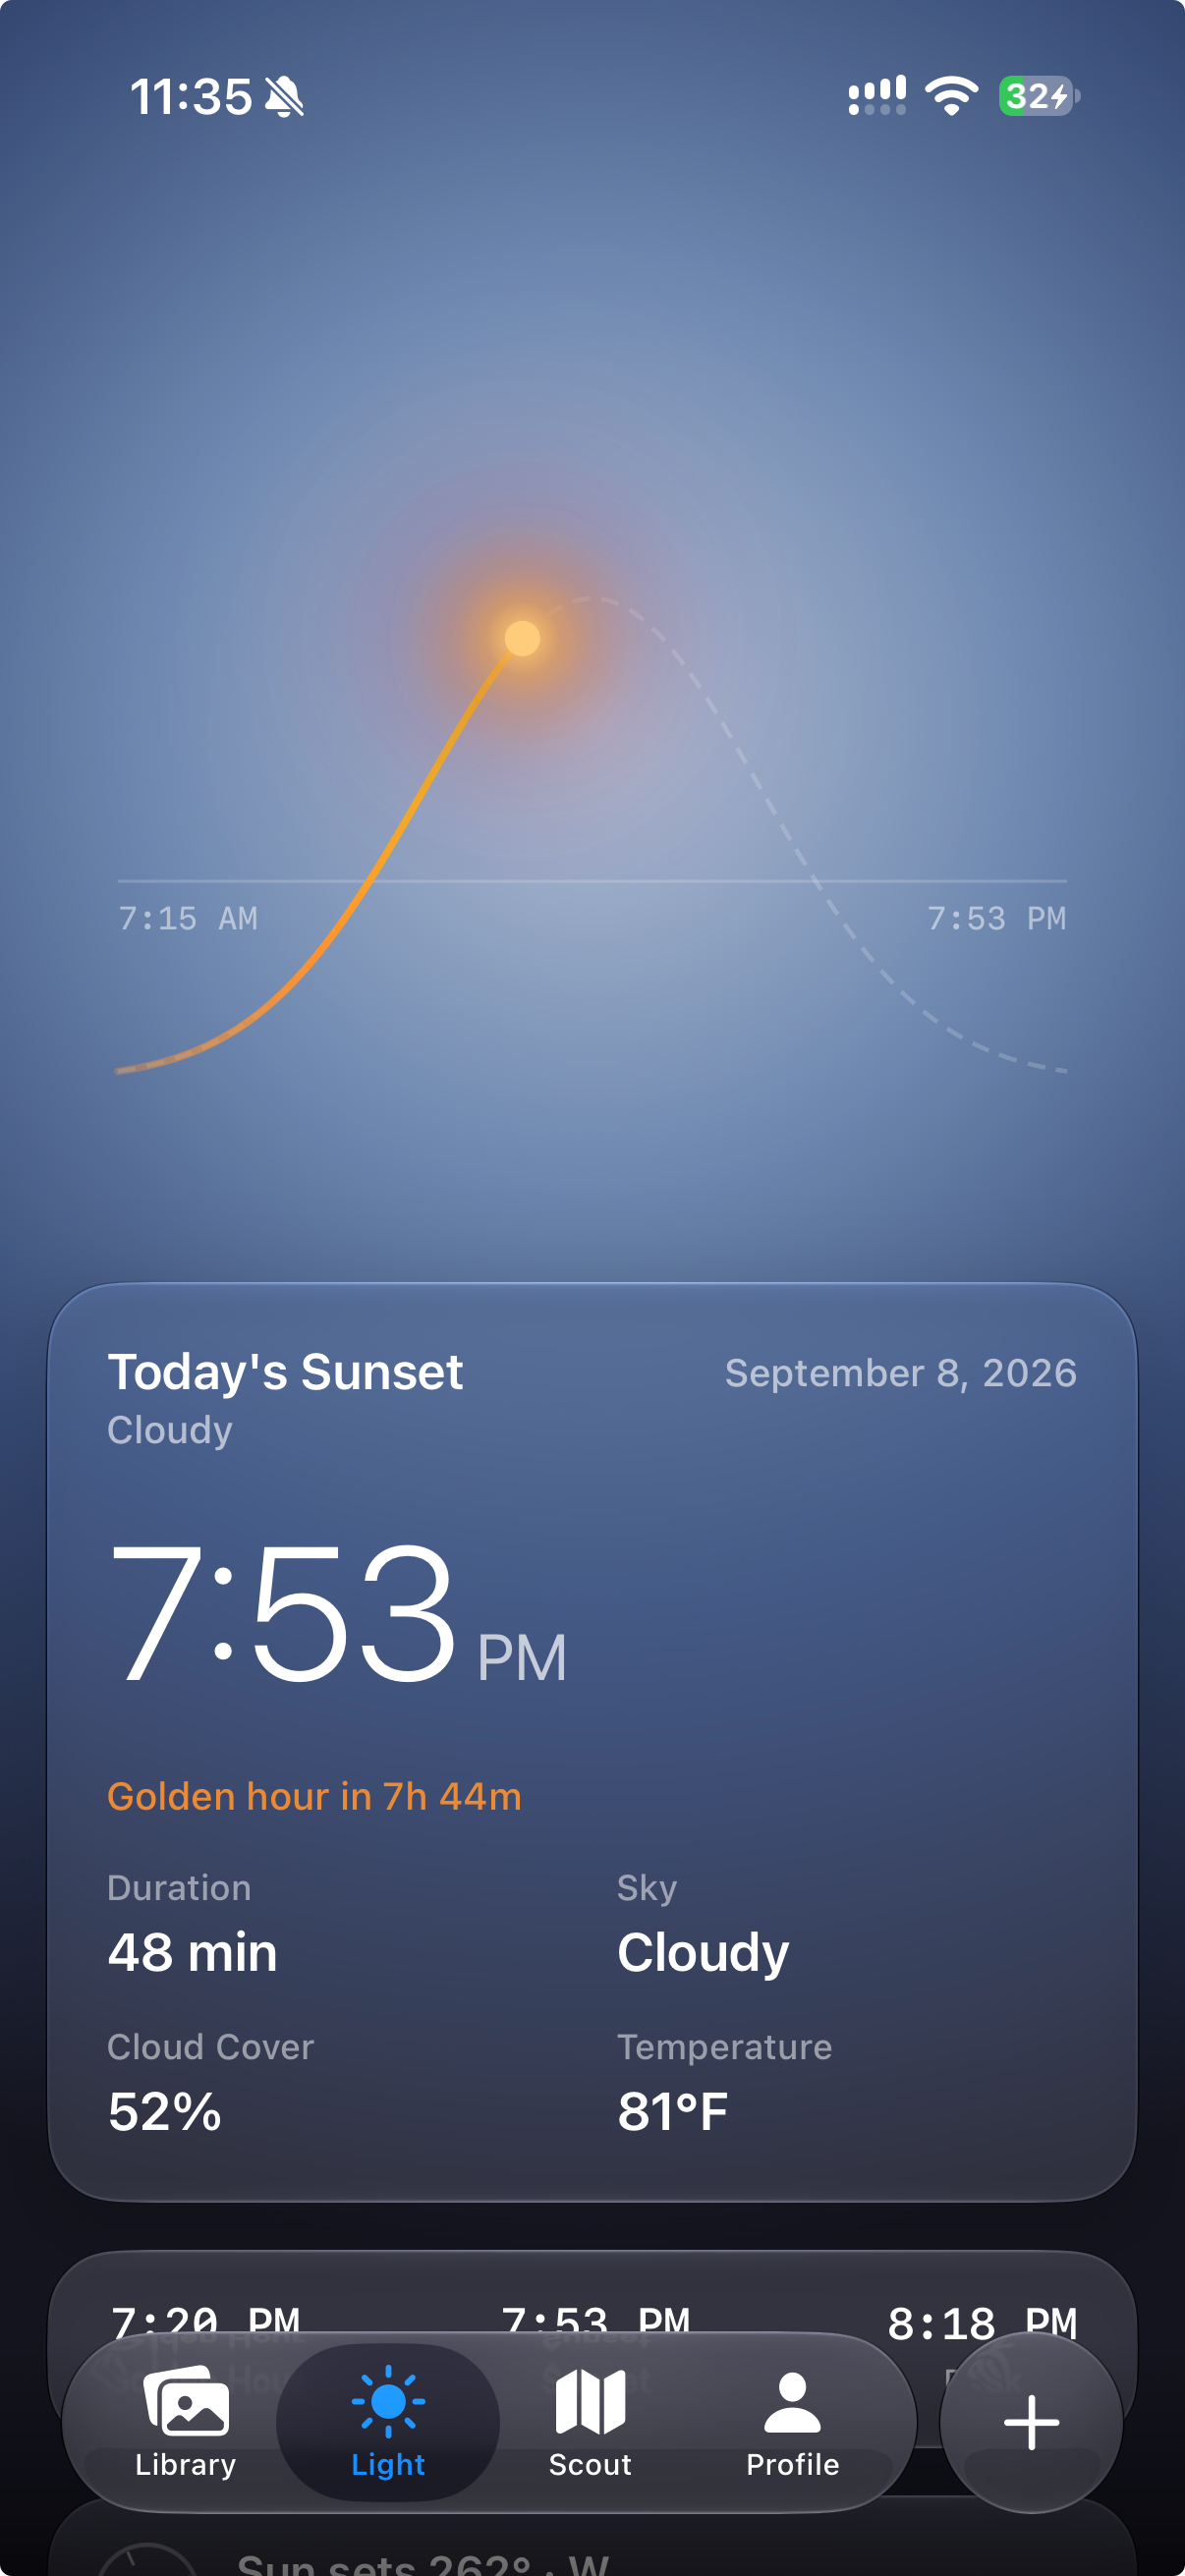
Light combines the sun path with sunrise, sunset, and golden-hour information. The timeline helps you consider the sequence of changing light rather than treating the listed sunset time as the entire plan.
The view includes golden-hour timing and duration, civil dusk, and sun direction expressed through azimuth and a compass direction. Today's events and the tomorrow-sunrise state support the next shoot. Use the location and its time context when reading those times.
Direction changes the composition you can make. Before traveling, consider whether the sun will be behind the subject, to one side, or facing it. Once on location, buildings, trees, and terrain can affect when direct light actually reaches the scene.
Sky condition, cloud cover, and temperature add weather context. They are planning information, not a guarantee of the appearance of the light. Leave room to adapt: a planned sunlit edge may become soft overcast light, and the composition may still work with a different treatment.
Scout: find places and build a location library
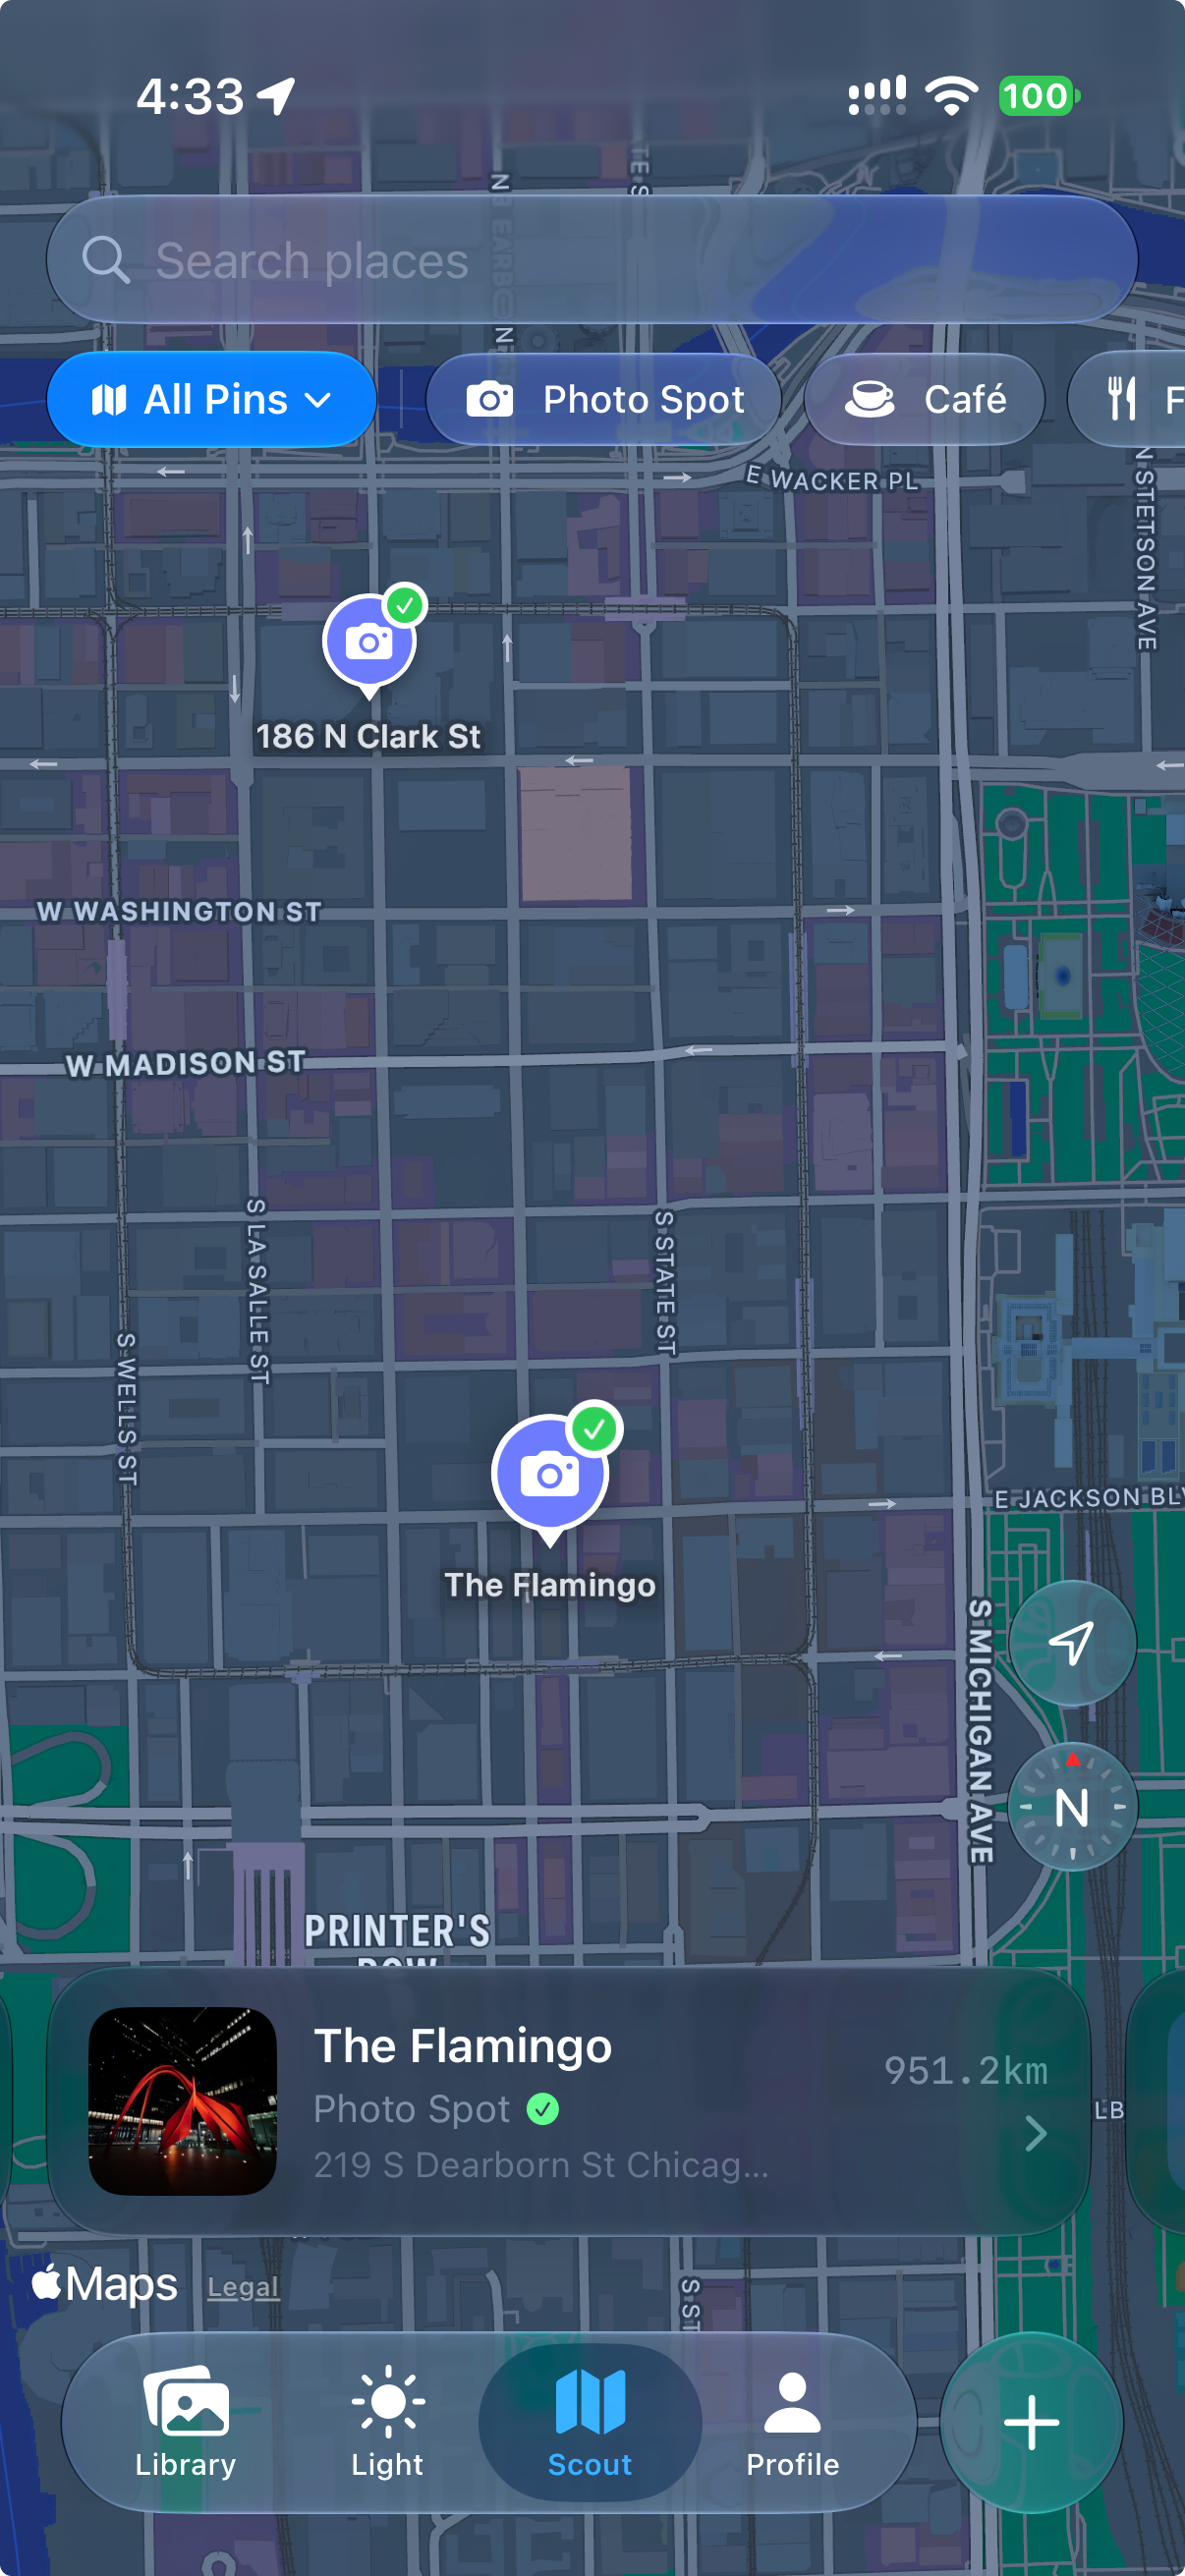
Scout combines map browsing, place search, and location pins. Filters distinguish All Pins, My Pins, Public Pins, and Saved, while category filters narrow the kind of place you are exploring.
Open a pin to move from a map marker to its imagery and information. Save useful places into lists so the next search can begin with a considered collection: an area to explore, possible portrait locations, or stops for a future trip.
Creating a pin is also a way to record your own location knowledge. Consider whether the information belongs in private planning or a public contribution, and use the available visibility and submission controls accordingly.
Directions actions hand off to the available navigation apps. Scout helps collect and organize the location; the navigation app handles the route. Check the pin's information and the location's current access arrangements when preparing the shoot.
Profile: identity, lists, and community
Profile brings together your Remjet identity, shared pins, lists, badges, and follower relationships. Edit your profile to choose how you appear in community views, and use your lists to organize the places you want to return to.
List visibility matters: a public collection serves a different purpose from a private working shortlist. Review that choice as part of organizing the list. List invitations have explicit accept and decline actions so you can decide which shared collections to join.
Signing in enables the profile and community workflow. The public profile presents the information and contributions intended for that context; it should be curated as deliberately as the images and location notes you choose to share.
iOS shortcuts, controls, and widgets
Remjet exposes shortcuts for Open Camera, Open Library, Check the Light, Open Scout, Create Collage, Create Video Project, Create Slideshow, and Create Pin. Use them to reach a specific workflow from Siri or the Shortcuts app rather than always navigating from the main screen.
On compatible devices and iOS configurations, assign the relevant action to a system entry point such as the Action button. Dedicated controls include camera and creation actions for a collage, video project, slideshow, or pin. Quick Camera and Next Light widgets provide additional ways to reach capture or check upcoming light information.
Camera Control integration is another launch route on supported hardware. A launch from a locked device asks you to unlock before entering the full camera workflow. It should not be treated as a separate locked-camera viewfinder or an unattended capture action.
Choose shortcuts around the way you actually work. One photographer may want the camera a button press away; another may check the light first or create a location pin while scouting. The useful setup is the one that removes steps from a repeated task.
Remjet's first chapter
Remjet 1.0 connects planning, capture, and editing while giving each part of the process its own controls. Start with the workflow you need today, then build a repeatable approach to the rest: a camera configuration for a familiar subject, a consistent grading treatment, or a project structure you can revise as the story develops.
This blog will also document subsequent versions, with a post for each release describing new features, improvements, and fixes. Dedicated guides will take individual workflows further, with examples and step-by-step detail for the tools introduced here.